
In the prior post on Tuning the MCP Express (XE) Installation, I described how to modify the properties of the ODT and MARC terminal emulation windows, use the MCP's Automatic Display Mode (ADM) to configure the ODT displays, and eliminate the annoying waiting entry for SYSTEM/ESR/ASSISTANT that occurs after each halt/load.
This post will describe how to connect from Windows to shared directories in the MCP and install Windows client tools to help you use the MCP environment. As with the prior post, most of the topics in this post are applicable to all MCP systems, not just XE.
Introduction to MCP Directory Shares
The first topic to discuss is MCP directory shares. This introduces one of the primary features for connecting to MCP resources over a network.
At this point in its installation and setup, our MCP system is able to communicate only with the Windows environment on the workstation in which it is running. Once we have external networking set up -- described in a later post -- you will be able to connect to the MCP from other TCP/IP-enabled systems.
Windows Networking and Shares
Microsoft Windows has supported the ability to connect to and access resources on other Windows systems since the early 1990s, starting with Windows for Workgroups 3.1. Originally this was implemented using NetBIOS over IPX, but later transitioned to NetBIOS over TCP/IP (ports 137-139) and became known as the Server Message Block (SMB) protocol. With the release of Windows 2000, Microsoft implemented a variant of SMB known as the Common Internet File System (CIFS), which operates over TCP/IP port 445. Later versions of SMB also operate over port 445.
Eventually compatible SMB implementations were developed for non-Windows systems, e.g., SAMBA for Unix and Linux. Unisys developed SMB for the A Series systems in the mid-1990s. This was one of several initiatives at the time to broaden the MCP's ability to operate in a TCP/IP environment, resulting in a considerable enhancement of MCP functionality and interoperability. Thus, Unisys decided to rebrand systems having these enhanced networking abilities under the name "ClearPath MCP" and discontinue the A Series brand. MCP 18 presently supports SMB1, CIFS, and SMB2, but not SMB3.
SMB is perhaps best known as a protocol to access a remote disk file system, but is also used to access printers and CD-ROM drives and to implement inter-process communication (IPC) using named pipes. The MCP supports all of these modes.
MCP systems can operate as both a server and a client in SMB networks. In this post we will be discussing its use only as a server for providing access to file system directory shares. Originally, the server side of SMB was known as NX/Services, and some software components still use that name. Server-side SMB is now known as Client Access Services (CAS).
The client side of SMB is implemented through a facility known as the Redirector (the REDIRSUPPORT library), which is documented in the "Using Virtual Files" section of the I/O Subsystem Programming Guide. For an introduction to the Redirector, see this UNITE presentation.
In order to share resources over a network, you need to be able to identify them. SMB uses a three-part identifier known as the Universal Naming Convention, or UNC. On Windows systems, it has the familiar form:
\\servername\sharename\filename-path
- The servername identifies the server or host system that is sharing a resource to the network. For MCP systems, this is the name that is specified using the
HN(Host Name) ODT command. As we saw in a prior post, this name must be specified in order for the networking software to initialize properly. - The sharename identifies the resource that is being offered to the network. When enabling access to files, this name usually maps to a directory in the server's file system.
- The filename-path identifies a specific element of the shared resource. For directory shares, it is the filename path relative to the directory that is being shared.
The filename-path and its "\" are optional and may be omitted. On most systems other than Windows (including the MCP), forward slashes ("/") are used instead of back slashes ("\") in UNC names.
The primary documentation for configuring and using SMB on MCP systems are two Windows Help files, available under the "Administration" heading on the MCP 18 documentation index page:
- Client Access Services Administration Guide -- describes how to configure and maintain shared MCP resources.
- Client Access Services User Guide -- describes how to establish connections to and use shared MCP resources.
Predefined MCP Shares
MCP systems have a number of predefined shares and the system administrator can create additional ones. These are stored in the file *SYSTEM/NXSERVICES/CONFIG on the disk family where the NX/Services software is installed -- usually family DISK. This file does not exist until the configuration is modified in some way, so initially a default configuration is loaded into memory from *SYSTSEM/NXSERVICES/DEFAULTCONFIG. Both are text files that you can examine with CANDE or another MCP editor. You must not modify either of these files directly. There is a Windows GUI utility that manipulates this configuration, which we will explore shortly. There is also a batch procedure that is described in the Administration Guide.
There are three predefined shares in the default configuration that are relevant to this discussion:
INSTALLS- This is a share that points to the MCP directory*SYSTEM/INSTALLSon the NX/Services family. This directory contains a number of Windows utilities that you can install on your workstation or any other Windows system that is connected to your MCP environment. We will make use of this share below._HOME_- Note the leading and trailing underscore ("_") characters. This is a generic share that will access the default directory for the MCP user who logs on to the share. You use this to access the directory where, for example, your CANDE files are stored by default._HOMEXL_- This points to the same directory as_HOME_, and when reading files works identically to it. When creating files, however, it uses a larger area size attribute (2,880,000 bytes or 160,000 sectors as opposed to 45,000 bytes or 250 sectors), which allows much larger files to be written.
Mounting a Share to the MCP
To see how CAS works, we will mount a share to the home directory for the MCP's Administrator usercode. We will need something to look at in that directory, so if you have not yet used MARC or CANDE to create a file under this usercode, you can copy one there by transmitting the following command on the ODT:
COPY *EXAMPLE/MCPSQL/CLI/ALGOL AS (ADMINISTRATOR)EXAMPLE/MCPSQL/CLI/ALGOL FROM DISK TO DISKThe "FROM DISK TO DISK" bit at the end is the default in this case and can be omitted. This will copy an Algol program to the usercode's default directory. This particular program illustrates how to program the SQL command-line interface for DMSII, but its purpose is unimportant in this discussion, and you can use any source file.
Now right-click the Computer or This PC icon either on the Windows desktop or in Windows Explorer and select Map Network Drive... from the context menu, just as you would for mapping a share to any other system. Choose a drive letter, and for the folder specify "\\servername\_HOME_", where servername is the host name of your MCP system. Enter the HN command on the ODT if you've forgotten what the host name is. I recommend that you tick the Connect using different credentials checkbox, although usually that is not required. Click the Finish button to initiate the connection.
It may take a few seconds, but Windows should present you with a credentials dialog. If you get an error that the network path cannot be found, then it's likely that the servername has not been defined in your LMHOSTS file. For now you can just substitute the MCP's EVLAN address for the servername, 192.168.16.5.
Once you get the credentials dialog, enter the MCP usercode ("Administrator") and the current password for that usercode. Note that while user names are case-insensitive, passwords for SMB/CIFS connections are case-sensitive, so you will probably need to enter the password in upper case. Once the share is established, Windows should open an Explorer window showing the first-level files and directories in your home directory. It will not show object files and certain other system-sensitive files.
We have not discussed adding additional usercodes to the system yet, but eventually you will probably have multiple usercodes for your MCP environment. Note that, just as with other SMB shares, a given client can connect to a given MCP server using only one usercode at a time. You can establish multiple shares simultaneously between a client and server, but all connections must use the same usercode. This is a restriction imposed by SMB, not the MCP.
When you are finished using an MCP shared directory, you disconnect it in the same way as for any other share.
Manipulating Files in the Explorer Window
You can open one of the files with a text editor (Notepad will do) and scroll through the lines of text. Note that only the text portion of source code files is shown -- sequence number and patchmark columns have been stripped by CAS. Alas, this is by design. CAS has read the record-oriented data from the MCP file, translated EBCDIC to ASCII, inserted CR/LF delimiters between the records, and transmitted the resulting data to the Windows environment as an ASCII byte-stream.
You can modify this file in Notepad and save it, but don't do that. Reading and writing record-oriented files between the MCP and a remote host is asymmetric -- Client Access Services has converted the record-oriented file to a byte-stream. If you save the file in Windows, it will sent the MCP back a byte-stream and Client Access Services will store the data in the MCP file system as a byte-stream. You'll lose the sequence numbers and patchmarks, and CANDE (along with most other MCP utilities) will not be able to read the file. It is possible to read and write byte-stream files on the MCP, but that is a subject for another time (in the interim, you might be interested in looking at this, this, and this). It is also possible to transfer a Windows file to the MCP using Explorer and have it converted to a record-oriented file, as we will see later in this post.
You can rename and delete MCP files from the Explorer window, as well as from a Windows command line, just as you would with other directory shares. You can also examine the properties of a file and modify a few MCP attributes.
You can copy and move files from the MCP share to your local file system using Explorer, but they will also undergo the same transformation described above for the file loaded into a text editor. You can transfer files from your local file system to the MCP share, where they will be stored on the MCP as byte-stream files. You also can copy and move MCP files to MCP directories on this or a different MCP share, but you probably do not want to do that, because the file will undergo the same transformation from record-oriented to byte-stream and will be stored in the destination MCP directory as a byte-stream.
Note that unlike the MCP file system, SMB does not permit a node in its view of a file system to be both a file and a sub-directory. If such a node exists in the shared MCP directory, Windows will see only the file. The sub-directory will not be visible. If you attempt to transfer a file to the MCP that has the same name as an existing sub-directory, Explorer will warn that you are attempting to replace the entire sub-directory, and if you confirm the warning, it will replace it.
If you transfer a sub-directory from Windows to the MCP, the parent directory for the resulting MCP sub-directory will have an additional zero-length file with the same name as the sub-directory. This file is used to maintain MCP file attributes for the directory as a whole. You will not see this extra file on the Windows side, but it will be visible to MCP applications and services.
Installing MCP Client Applications
An MCP release comes with a collection of primarily Windows utility programs that you can download and install on your workstations. MCP Express has loaded these install packages to the MCP directory *SYSTEM/INSTALLS on the halt/load unit, usually family DISK. As mentioned above, Client Access Services has a predefined share for this directory named INSTALLS. In this section we will establish a connection to that share and install a basic set of those utilities.
To start, map a share to \servername\INSTALLS as you did for the _HOME_ share above. It is best to use a privileged usercode (such as the Administrator account) to log on to this particular share, as some applications are not available to regular users. In the Explorer window that opens after the connection is established you will see a number of folders. Each of these contains the install package for one of the utilities or services.
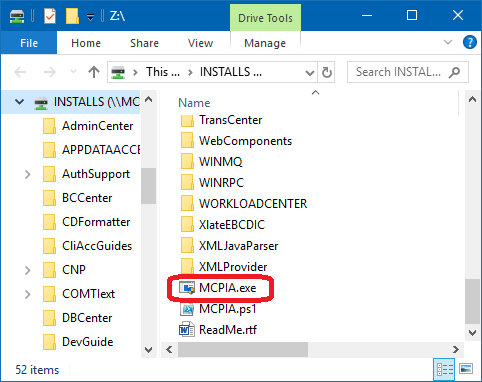
You can open these folders and download the install packages yourself, or even double-click them to install directly from the share. When starting out, though, it is easier and safer to use the MCP Installation Assistant, MCPIA.exe. The ReadMe.rtf document on the share describes the program's minimum requirements and how to use it.
Double-click on the program to start it -- make sure you open the .exe file, not the .ps1 file. Accept the Windows UAC warning and enter your MCP credentials when prompted to do so. The program will initialize and display a window with a hierarchical list of applications you can install.

You can tick the checkboxes to select whole categories of applications, or expand the categories to select individual ones. It is easy to go wild with this tool and install lots of applications you will never use, so start with a minimal set. You can always come back and add more applications later. Here is what I recommend to install initially:
- ClearPath Integration Software:
- Administration Center (highly recommended).
- Explorer Extensions for Client Access Services (also highly recommended).
- MCP File Copier.
- DO NOT SELECT the Web Enabler application. Web Enabler is already installed as part of XE. Installing it again will delete your existing configuration files for the ODT and MARC windows.
- Client Access Services Guides (optional, but recommended):
- Client Access Services Administration Guide.
- Client Access Services User Guide.
- Tools and Utilities:
- Programmer's Workbench for ClearPath MCP (also known as PWB or NX/Edit).
You are of course free to select additional applications at this time if you are familiar with them and know you will be using them. I recommend you accept the default installation directory in the file-picker control below the application selection list. Click the Next button at the bottom of the page to continue. The program will display a list of the applications you selected to confirm. Click the Install button to initiate installation of them. If any of these applications had been previously installed on your workstation, they will be uninstalled before the new version is installed. The window will show a log of progress.

Click the Exit button to terminate the Installation Assistant. In the next section, we will briefly explore the programs just installed.
Using the Client Utilities
Most of the items installed using the MCP Installation Assistant are ordinary Windows applications and will have entries on the Windows Start menu under the Unisys MCP sub-menu. Explorer Extensions is a Windows Explorer plug-in, thus is not a program you run directly. The Client Access Services Guides are Windows Help files, but also have entries on the Unisys MCP sub-menu.
Administrator Center
Administration Center is a client/server GUI used by system administrators to configure and control Client Access Services. It runs in the Windows environment and communicates over the network with a server component in the MCP environment. You use this utility to configure shared resources for the MCP and set global options for Client Access Services.
To run Administration Center, select it from the Unisys MCP sub-menu of the Windows Start menu. It will open a window on your desktop and display the following dialog box:
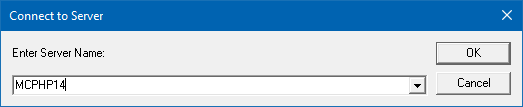
Enter the host name of your MCP environment in the combo box. If you have previously run Administration Center, the name can be selected from the combo box's pull-down list. If you currently have a connection established to Client Access Services, e.g., a directory share, Administration Center will connect using the credentials for that connection; otherwise it will prompt for an MCP usercode and password.
Note that in order to use the full capabilities of Administration Center, you must connect using a privileged usercode. If you previously established one or more connections to Client Access Services with a non-privileged user, you will need to disconnect all such connections before starting Administration Center, as the SMB protocol allows connections for only one account at a time between a given client and server.
Most of the work with Administration Center is done through its Resources menu. Through it you can configure directory shares, CD-ROM shares, and MCP named pipe services. You can also update the global options for Client Access Services, which is what we will explore first.
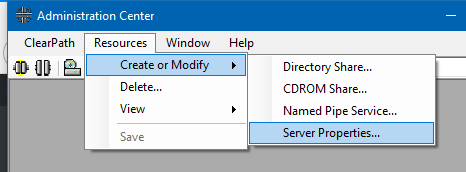
Select the Resources > Create or Modify > Server Properties... menu item. This will open a tabbed dialog showing the global options. The first tab shows the name of the Windows domain or workgroup to which the MCP environment will be a member.
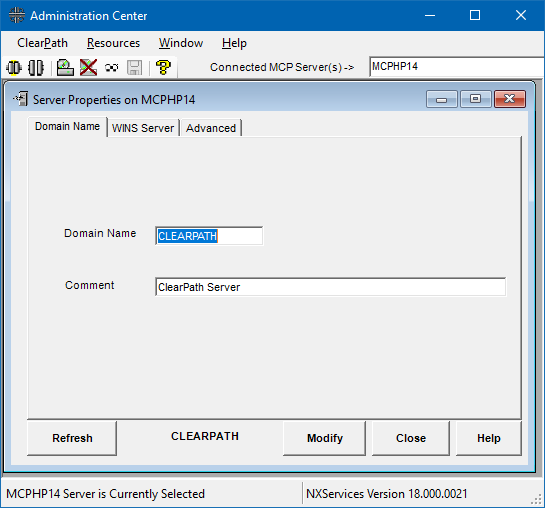
The domain/workgroup defaults to CLEARPATH, which you should change to reflect your local Windows environment. You can determine your domain/workgroup name by right-clicking on the Computer or This PC node in Windows Explorer and selecting Properties... from the pop-up context menu. By default, most Windows systems are configured for a workgroup with the name WORKGROUP, but you can choose any name you wish. For example, I use a workgroup named PARADIGM. You can optionally enter a comment describing your MCP environment. Next, click the WINS Server tab.

WINS (Windows Internet Name Service) is a naming service for the NetBIOS protocol on top of which SMB was originally implemented. It is not used much anymore. If you have one or two WINS servers, you can enter their IP addresses on this tab. If you do not have a WINS server or don't understand what this means, you can leave the fields on this tab blank. Click the Advanced tab to continue.
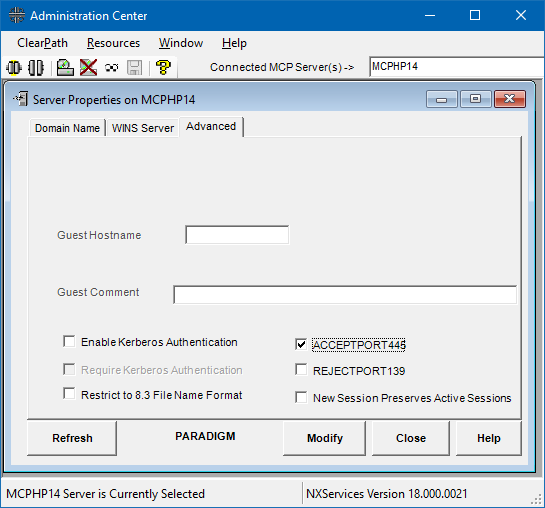
The screen shot above shows the settings I recommend you use for XE. The only change from the default settings is that the ACCEPTPORT445 checkbox has been ticked. This allows the MCP to accept CIFS and SMB2 connections on TCP/IP port 445, which is what most SMB clients now attempt to use first.
When you tick the checkbox for port 445, the REJECTPORT139 checkbox becomes enabled. Port 139 (along with ports 137 and 138) is used for the older, NetBIOS-based SMB1 protocol. Many internal networks for businesses now disable NetBIOS and SMB1 due to their less-robust security characteristics. Windows systems have supported port 445 since Windows 2000, so unless you need to connect with an older system that only supports SMB1, you may want to consider ticking this checkbox to disable port 139. This setting will be more significant once we have the MCP talking on an external network, but for most home or personal networks, it is reasonably safe to leave port 139 enabled.
Consult the Administration Center help and the Client Access Services Administration Guide for information on the other settings for this tab.
When you have finished setting options on the Server Properties dialog, click the Modify button at the bottom of the window. This will save the settings in Administration Center's internal tables but not yet apply them to the running MCP configuration. Click the Close button at the bottom of the page to dismiss the dialog. If you close the dialog without clicking the Modify button, Administration Center will silently discard any changes you made.
Before applying the changes above to the running configuration, select the Resources > View > Available Resources... menu item. This displays a list of all the shared resources currently configured in the MCP environment.
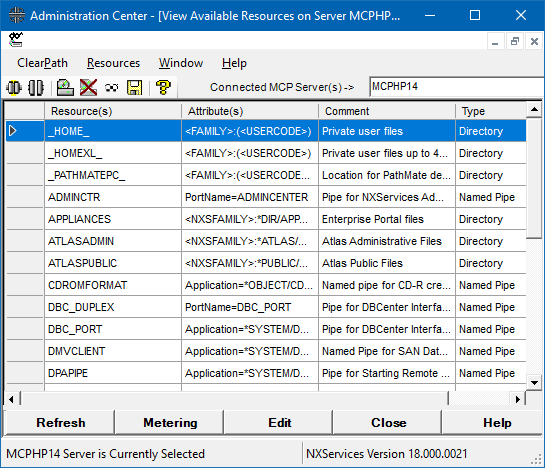
You can modify an existing resource by selecting its entry in the list and clicking the Edit button at the bottom of the dialog. You can also modify existing resources and create new ones through the Resources > Create or Modify menu item. Configuring new shared resources is beyond the scope of this post, but you can learn about it in the Administration Center help file and the Client Access Services Administration Guide.
The final thing to do in Administration Center is to save the configuration changes you have made and apply them to the running MCP environment. Select the Resources > Save menu item and confirm that you want to do the save. Administration Center will transmit the changes to its server-side MCP component, which will in turn update the running configuration dynamically. You will see a dialog box confirming the success or failure of the update. At that point you can close the Administration Center window.
There is an alternate way to modify the configuration of global options and shared resources solely within the MCP environment. This involves editing a text file and running a utility program against that file. This is exactly what the server-side component of Administration Center does for you, but you can do it directly using CANDE and/or MARC. For more information, see the Client Access Services Administration Guide chapter "Configuration File Attributes" and in particular its sub-topic "How to Access and Edit the Configuration File."
MCP Explorer Extensions
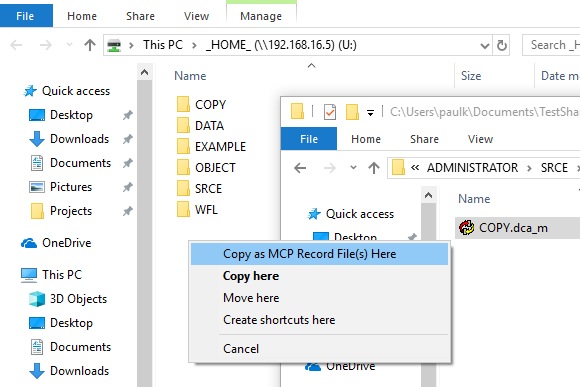
This plug-in allows you to transfer byte-stream files from Windows to an MCP shared directory in a way that creates standard MCP record-oriented files. It has no effect when transferring files from the MCP to Windows. It is documented in the Explorer Extensions Guide, also available under the Unisys MCP Start menu. See the topic "MCP Share Extensions > Copying Files as MCP Record Files."
You are likely familiar with click-and-drag operations in Windows Explorer to copy and move files between directories. The Explorer Extensions plug-in is activated by doing a right-click-drag from a Windows directory to an MCP shared directory. The context menu that pops up when you release the mouse button has an additional entry at the top, Copy as MCP Record File(s) Here:
If you select that additional entry, a dialog box will pop up, allowing you to specify the characteristics the record-oriented file should have in the MCP file system:
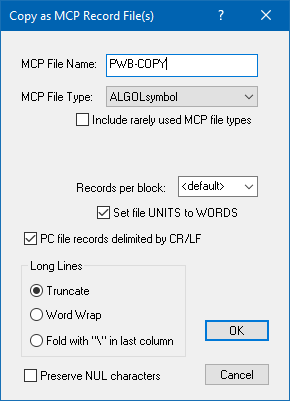
Clicking OK will transfer the byte-stream data to the MCP, where Client Access Services will transform it into a record-oriented file according to the attributes specified on the dialog, and store it in the MCP file system. If the selected file type is one of the symbolic file types, Client Access Services will generate sequence numbers and a blank patchmark field. In the case of Algol and similar symbolic files, the sequence numbers will be 10000+100. In the case of files of type DATA, the dialog will display an additional option to specify the record size. You may need to manually refresh (F5) the Explorer window to see the file after the transfer completes.
Explorer Extensions recognizes a set of Windows file extensions (.alg, .c74, .wfl, etc.) as specific MCP record types and will automatically select that type on the dialog box. You can override this automatic association if desired. See "Default PC File Extensions" in the help for the complete list of recognized file name extensions.
Installing Explorer Extensions adds two additional features to the Windows environment. Both of these are also documented in the Explorer Extensions Guide:
- Two additional tabs on the Properties dialog box for files in an MCP shared directory, MCP File Attributes and MCP File Security. These contain MCP-related information about the file and allow you to change a few of the attributes.
- A command-line utility,
\Windows\MCPCopy.exe, that can transfer individual files or entire directories of files between Windows directories and MCP shares, converting in both directions between byte-stream and MCP record formats. This program supports more options than the simple click-and-drag feature. Its capabilities are similar to those of the MCP File Copier utility discussed below, butMCPCopyis suitable for use in scripting.
MCP File Copier
MCP File Copier is a Windows GUI that will transfer files and directories of files between Windows and an MCP shared directory, converting between byte-stream and MCP record formats as necessary. It offers more options than the click-and-drag method discussed above, including the ability to preserve sequence numbers and patchmark fields when copying from an MCP shared directory to Windows. It offers essentially the same features as the MCPCopy.exe command-line utility mentioned above, but is easier to use.
In order to use either copy program, you must first establish a connection to an MCP shared directory. You can refer to the shared directory in the file name controls below either by its mapped drive letter or by its UNC name. Since this is a Windows interface and connects to the MCP using SMB, you must use back-slashes ("\") instead of forward slashes ("/") in MCP file names.
To run the GUI program, select the Unisys MCP > MCP File Copier item from the Unisys MCP sub-menu of the Windows Start menu. This will open a window with two tabs, one for transferring files from Windows byte-streams to MCP record files, and one for going in the opposite direction. Let us consider transfers from byte-streams (referred to as "PC Streams" in the interface) to the MCP first:
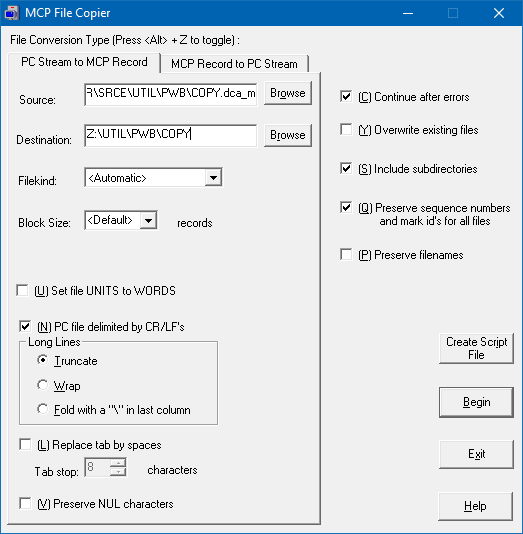
The tab has file-picker controls to select the Source (Windows) and Destination (MCP) file or directory names. The final node of the source name may contain wildcards. If the Filekind pull-down list is set to "<Automatic>," the Windows file name extensions will be used to map to MCP FILEKIND attribute values. See the help file for a list of the extensions the program accepts. In addition to simple extension names like ".cob" and ".wfl", the program also accepts the extensions used by Programmer's Workbench, e.g., ".cob_m" and ".wfl_m".
Most of the options on the dialog should be obvious, and you can consult the help file for more information on them. Once you have the options set, click the Begin button to start the transfer. A dialog will pop up to display file-by-file progress.
One nice feature of MCP File Copier is that it can be used to prepare a command-line script for use with MCPCopy.exe. Simply set the options on the dialog and click the Create Script File button to save the command as a Windows .bat file.
When transferring whole directories of files using MCP File Copier or MCPCopy.exe, there are three things to keep in mind:
- You will usually want to set the Include sub-directories option or use the "
/s" switch. - Destination directories on the Windows side and any Permanent Directories on the MCP side must already exist. Neither utility will create these directories automatically. Temporary directories on the MCP side (the usual kind) will be created automatically, as they simply represent nodes in the file name.
- As mentioned earlier, the MCP file system supports file names that can refer to both a file and a directory. Windows and the SMB protocol do not support this. If a file name references a node in the MCP file system that is both a file and a directory, only the file will be accessible to Windows. The MCP directory and the files under it will be invisible to the Windows side of the connection.
To transfer files from an MCP shared directory to Windows, select the "MCP Record to PC Stream" tab. You can also toggle between the tabs by keying Alt-Z.

The layout of this tab is similar to that of the "PC Stream to MCP Record" tab, but the options reflect the variety of ways that MCP file data can be represented in Windows. You can choose to keep or remove sequence numbers and patchmark fields, keep or trim trailing spaces on lines, replace spaces with tabs, and preserve MCP file names as is (i.e., not add an extension to the name).
The final node of the source name may include wildcards, using the Windows convention of "*" rather than the MCP convention of "=". The program will transfer only those MCP FILEKINDs that represent data, source code, and (if the Programmer's Workbench box is not ticked) printer backup (spooled) files. It will ignore object or system files and not transfer them.
When transferring a whole directory of MCP files, the destination must be a Windows directory and must exist. The program will create any subordinate directories on the destination as required. If you need to transfer source files from the MCP to Windows and include files from a directory that would be hidden because there is a file of the same name as the directory, consider using my PWB/COPY utility, which runs in the MCP environment and uses the Redirector to transfer text files to a Windows share.
Programmer's Workbench (PWB)
PWB (formerly known as NX/Edit) is a GUI text editor for MCP source files. It can also be used with data files that contain text. PWB has a lot of features, and a full treatment of them is well beyond the scope of this post. I have used it for years as my primary MCP editor and encourage you to try it. It has a good help system, which includes introductory tutorials.
PWB understands sequence numbers and patchmark fields, as well as the columnar format and restrictions of MCP source files. It can be used as a replacement for the editing functions of CANDE and the TD830 editor (OBJECT/ED), can compile programs, and can run object programs and start WFL jobs. Like OBJECT/ED, it supports the creation and update of symbolic patch files. PWB also has an ActiveX interface, which allows you to script many of its functions and do batch editing of files.
PWB can edit files directly in the MCP file system or files stored in the Windows file system. You can have multiple files open from multiple origins simultaneously. Each file resides in a sub-window, and you can switch among them at will. You can even open files in one file system and save them in the other, which is yet another way to transfer files between the MCP and Windows environments.
When editing files directly in the MCP, PWB connects to a server-side component, SYSTEM/NXEDIT/SUPPORT, over TCP/IP port 126. It does not use SMB or Client Access Services to access MCP files. When editing files in the Windows file system, it stores the files using extension names ending in "_m" (for MCP), e.g., ".alg_m", ".c74_m", etc.
PWB is very picky about the format of files in the Windows file system that it will open, and will refuse to work with files that do not meet its requirements. It has an Import Wizard, however, that will convert most text files into its format. The "Programmer's Workbench compatible" option in MCP File Copier and MCPCopy.exe will generate text files in this canonical format and supply the appropriate "_m" extensions.
PWB stores files in Windows as ordinary CR/LF-delimited text files, so they can be viewed, printed, and copied the same way other Windows files can. Modifying one of the "_m" files in another editor, however, will typically cause PWB to consider the file to be corrupt. In that situation, you will need to use the Import Wizard in order to open the file in PWB again.
PWB has excellent session recovery. Between saves of a file, it maintains a local log of line-by-line changes. If the program or system crashes, it will offer you to option to recover the changes. This works both for files stored in the Windows file system and the MCP file system.
Finally, PWB supports line-by-line source-level debugging similar to that found in Visual Studio, Eclipse, and other modern IDEs. It integrates with the TADS (Test and Debug System) debugging tools to allow you to set breakpoints and variable watches, execute a line at a time, display the contents of data items, and use other features typical of a visual debugger.
I do not consider PWB to be a complete replacement for CANDE or OBJECT/ED. Each tool has its strengths and weaknesses, and I use all three. For example, PWB has only minimal facilities for renaming and deleting files, and no ability to copy files other than by way of open/save-as. In terms of day-to-day MCP code preparation and editing, however, PWB has long been my favorite MCP development environment.
Now that we have XE installed and networking between the local Windows and MCP environments, it is time to connect it to an external network so that it can communicate with other systems and devices. That will be the subject of the next post in this XE series.