In the Part 1 of this post, I covered installation of the Unisys MCP Express (XE) software and initial configuration of its MCP environment. In this Part 2, we will load the MCP and get it running, use the ODTs to operate the MCP and continue its setup, make local networking operational, and get access to MARC and CANDE.
You should continue to refer to the MCP Express Getting Started Guide during the following discussion. A PDF copy of this document can be found in the Unisys Documentation folder shortcut on your Windows Desktop.
Many of the tasks discussed below involve using the Operator Display Terminal or ODT. Two sub-sections in Section 4 ("Using MCP Express") of the Getting Started Guide give tips for using the ODT window and responding to certain conditions. I strongly recommend that you read these sub-sections before proceeding:
- "Tips for Using the ODT"
- "Understanding Waiting Entries"
The operator commands used with the ODT have a compact syntax that may take a little getting used to. Both Section 4 of the Guide and the following discussion will cover the ones you will need in the short term. The full specification for the ODT commands (and there are a lot of them) is in the System Commands Reference manual. I recommend that you access this document and start to become familiar with it. You can view or download a PDF version of the manual from a link in the ClearPath_MCP_Express_Release_4.0.html web page, which is also in the Unisys Documentation folder shortcut on your Windows Desktop. Also, the earlier blog post, Getting Started with MCP Express, describes how you can download a complete set of MCP reference documents, including the System Commands Reference, and store them on your local workstation.
If you have not continued to Part 2 immediately from Part 1 of this post, you should make sure that the MCP Firmware Services are running and that the MCP Console window is open before proceeding further. Please review the procedures for these in Part 1 of this post or at the beginning of Section 3 in the Getting Started Guide. Part 2 picks up in Section 3 ("Setting up the MCP Environment"), under the heading "Configure the MCP Resources," starting at step number 7.
Halt/Loading the MCP
The term halt/load (or H/L) is MCP parlance for what most other operating systems call a boot. The term comes from two buttons -- Halt and Load -- that were on the operator consoles for the Burroughs B5500 and B6500/6700. Those buttons have not been present on subsequent MCP systems for decades, but the name has stuck.
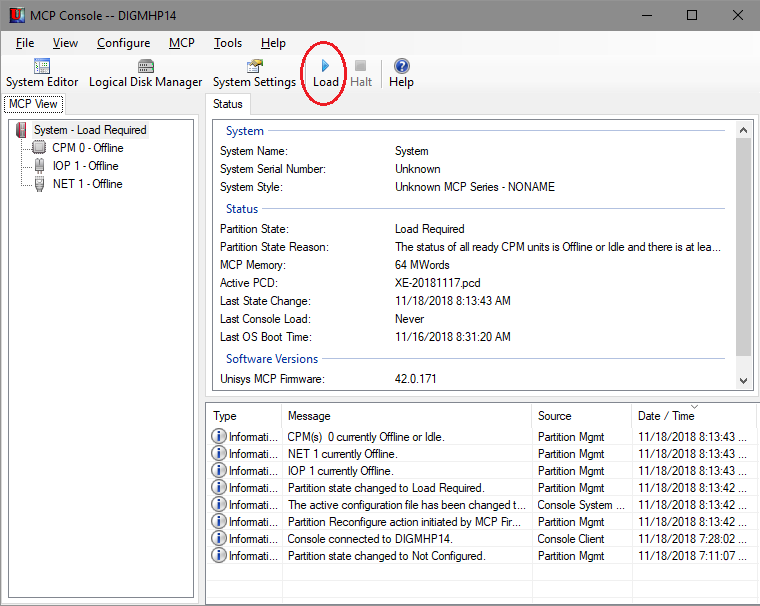
We are now ready to halt/load the MCP environment for the first time. On the MCP Console window, you can see the status of the emulated data processor, I/O processor, and network processor in the left pane, the overall system status in the upper-right pane, and a log of recent events in the lower-right pane. On the toolbar is a Load button (click on the image to display it in a larger size):
Click the Load button to initiate the halt/load sequence. As soon as you do that, switch to the Windows Desktop and double-click the ODT icon matching the SC unit you designated earlier in the System Editor HL Settings dialog. You can actually do these two steps in either order. You can also open both ODT windows, but for now they will display identical messages. The ODT terminal emulator will initialize and pop up a dialog requesting a user name and password. Enter your Windows log-on credentials:
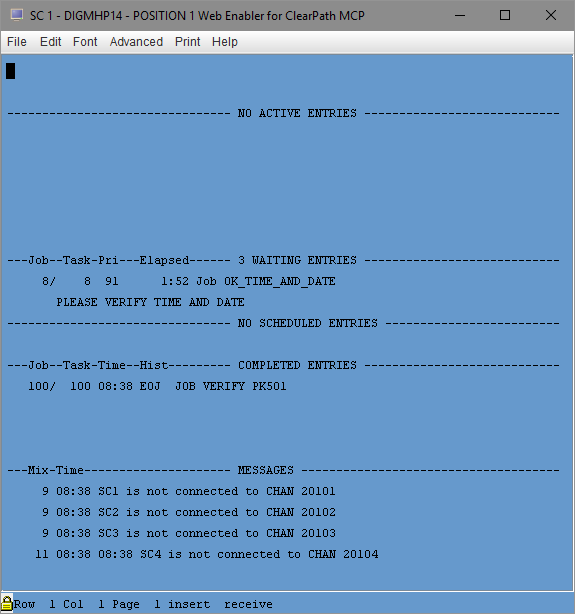
If you opened the ODT window quickly enough, you may briefly see the MCP display a halt/load message. Eventually you will something similar to the following screen shot, which will be refreshed approximately every four seconds:
On the MCP Console window, you can see that the emulated system components are now in a running status. At this point you can minimize the MCP Console, or even close its window. Once the MCP loads, the MCP Console is no longer needed. It is just a user interface for the firmware services, and can be stopped and started at will while the MCP is running.
As the ODT window refreshes, you will see that it cycles through a number of "waiting entries," also known as RSVPs. These are conditions the MCP has detected that require attention by the system operator (i.e., you). To see the full list of entries, press the Home key on your keyboard to place the ODT cursor in the home position, type a "W", and press the Enter key on your keyboard. ODT commands are case-insensitive. Enter is by default the key that transmits a message to the MCP. It sends all of the characters from the home position up to, but not including, the current cursor position.
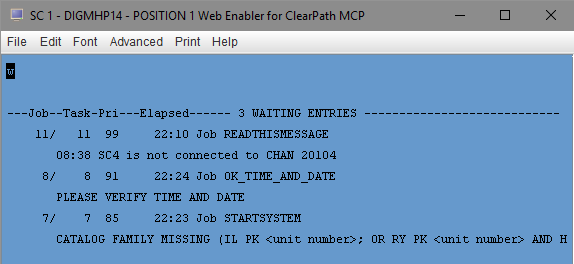
The full list of waiting entries will display, but will be wiped out by the automatic refresh a few seconds later. To prevent that, reenter the "W" command, and after the waiting entries display, press any key on your keyboard -- I usually press Home again -- to put the ODT into local mode. The result will probably look somewhat similar to this:
This example shows three two-line entries. On the first line of each entry, the number before the slash ("/") is termed the "job number," and the one after the slash is termed the "task number" or "mix number." The two numbers happen to be the same values in these examples, but generally when replying to a waiting entry you need to use the mix number -- the one to the right of the slash.
The next number to the right is the priority of the task that generated the entry. Following that is the elapsed time in minutes and seconds the entry has been waiting for attention. To the right of the time is the name of the job or task. The second line of the entry shows the message to which attention is requested.
The first of these entries for us to address is the third one in the list above, "CATALOG FAMILY MISSING". The Catalog is the part of the MCP file system that organizes and indexes the directories for all disk units in the system. We need to specify to the MCP which disk should hold the catalog. This is a one-time task for a new MCP file system. We have only one disk unit in the configuration at present, so the choice for the Catalog location is obvious -- PK 501, the halt/load unit. Many installations place the catalog on the halt/load disk unit anyway. Press Home on your keyboard and enter the following, followed by the Enter key:
7IL PK501There can be spaces after the "7" and after the "PK". The "7" indicates which task we are replying to. Most responses to waiting entries require a mix number to indicate which task the response is to be directed. Use the mix number shown in your message. "IL" (Introduce Label) is the ODT command to associate a peripheral device with a task that is requesting it, and "PK501" is the unit designation for the device. The result is that the MCP will create the system Catalog on that disk unit. After entering this command, you will see the message "DISK INITIALIZATION HAS BEEN COMPLETED", followed by a slew of other messages as the MCP begins initiating its various components.
The second waiting entry to deal with is "PLEASE VERIFY TIME AND DATE." Whenever the MCP loads from what it determines was a powered-down state, it displays this entry to allow you to check, and if necessary, correct the time and date. During its first halt/load, the MCP gets its time and date from Windows, but it does not automatically update its clock from Windows thereafter. Instead, it maintains an offset from the Windows clock and initializes the MCP clock using that offset against the Windows clock.
You can check the MCP time and date using the "TD" (Time Display) ODT command. This shows the time and timezone that is currently configured. Setting the proper timezone is important, as it allows the MCP to provide programs with time and date in UT (Universal Time, also called UTC or GMT). To change the time and timezone, use the "TR" (Time Reset) ODT command and specify the time in 24-hour format:
TR 11:12 TIMEZONE PSTThe timezone on my system was originally EST (U.S. Eastern Standard Time, UT-5). I have changed it to U.S. Pacific Standard Time, UT-8. In a later post, I will describe how to get the MCP to synchronize with an external time service and handle Daylight Saving Time transitions automatically.
Once you have the time set to your satisfaction, dismiss the waiting entry in one of these two ways:
- Enter the mix number of the waiting task followed by "
OK", e.g., "8OK". - Enter the "
TIMEOK" command. This is the one I normally use. Both commands do exactly the same thing.
You may or may not see a waiting entry similar to the third one, "SC4 is not connected to CHAN 20104". This is usually benign, and simply indicates that the MCP found SC4 (ODT 4) in the PCD, but no such device is active. Dismiss any of these messages using an OK message with the appropriate mix number, e.g., "11OK". As you dismiss one, another for a different SC unit may appear. Dismiss each one in turn. Sometimes these messages appear for active ODTs if you are a little slow in opening their windows and the MCP happens to test the device status before the corresponding terminal emulator window has fully initialized.
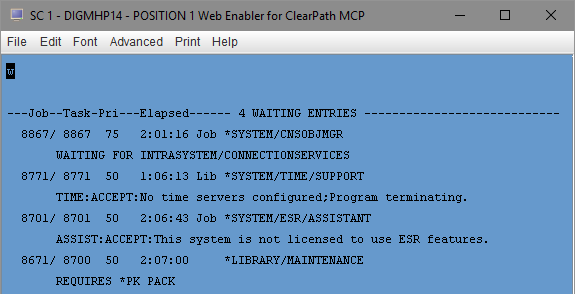
While working on these waiting entries, you probably noticed that the MCP posted several others. On my workstation, I saw these:
WAITING FOR INTRASYSTEM/CONNECTIONSERVICES:
This message indicates the network processor interface has not yet finished initializing and made itself available to the MCP. It is not uncommon to see this waiting entry briefly after a halt/load, but normally it should go away within a minute or so. Since this is the first halt/load for the system, we need to do some additional setup for networking, which we will deal with shortly. For now, ignore this message.TIME:ACCEPT:No time servers configured;Program terminating.
This message indicates that the SNTP time client has not been configured, so its MCP service will now terminate. This is another situation that normally occurs only after the first halt/load. We will discuss the SNTP client in a future post. For now, dismiss it with anAXmessage referencing its mix number, e.g., "8771AX OK".AXis the ODT command that replies to a program'sACCEPTstatement.ASSIST:ACCEPT:This system is not licensed to use ESR features.
ESR stands for Electronic Status Reporting. It is implemented with a variant of theSYSTEM/ASSISTANTutility, which the MCP initiates automatically after every halt/load. Alas, XE does not support ESR, and thus by default this message will appear after every halt/load. There is a way to suppress it, which I will discuss in a future post. For now, dismiss it with the following command referencing its mix number, e.g., "8701AX DS".REQUIRES *PK PACK:
This is a weird one. For some reason, XE versions 3.0 and 4.0 start a Library/Maintenance (WFLCOPY) job after the initial halt/load. This job is attempting to copy files from directorySYSTEM/ETAIOA/=to the disk familyPACK, which does not exist in our configuration. The job is probably the result of some minor bug in the construction of the virtual disk image file. Hopefully, it will be fixed in the next XE release. JustDSit referencing its mix number, e.g., "8700DS". You should not see this entry again following subsequent halt/loads.
After the preceding steps, the only waiting entry left should be the one for INTRASYSTEM/CONNECTIONSERVICES.
Setting Up the DUMPDISK File
The next step is setting up a so-called "dumpdisk" file. This is a reserved area in the MCP file system where the MCP can write the data for a memory dump. This is an optional step, but highly recommended, even though full system memory dumps should be quite rare with normal use of MCP Express. Without a dumpdisk file, the system will suspend itself when a memory dump occurs. The size of the dumpdisk file is specified in "kilo-sectors." An MCP sector is 30 words, so with a 64MW memory size, the smallest size you should specify is 2237 kilo-sectors. I recommend you make it somewhat larger than that, say, 3200 kilo-sectors. The file is created with the DN ODT command. This command names the dumpdisk file and its disk family, and supplies the size enclosed in square brackets, e.g.,
DN DUMPDISKFILE ON DISK [3200]The file can have any valid MCP file name, including multiple nodes separated by forward-slashes, e.g., DUMP/DISK/FILE. In the MESSAGES section of the ODT you should see a message similar to:
8901 12:15 *DUMPDISKFILE ON DISK HAS BEEN LOADED Initiating Local Networking
The next series of steps will set up local networking between the MCP and Windows environments on your workstation. Local networking will allow the MCP and local Windows environments to communicate with each other. Configuring the MCP to communicate with an external network will be covered in a later post.
The MCP initially has no host name. Until one is set, networking will not initialize properly, so the first thing to do is set one. A host name can be any string of 1-17 upper-case alphanumeric characters, but must start with a letter. I like to use names of 7-8 characters, starting with "MCP". Since I've given my Windows environment a host name of "DIGMHP14", I'll name my MCP environment "MCPHP14".
I have noticed a lot of people using the default host name in the preinstalled TCP/IP configuration, CPMCP1, but I suggest that is a poor practice. Pick a name that suits you, then set it using the ODT HN command, thus:
HN = MCPHP14Host name changes take effect only after a halt/load, so we must do one before proceeding. We could use the MCP Console to halt the MCP and then reload it, but there is an easier way that can be initiated from the ODT. Enter this command and press Enter:
??PHLPHL stands for Physical Halt/Load. The process should take less than a minute. Once the MCP is back up, dismiss the waiting message for ESR and any messages for inactive ODT units, as before. The waiting entry for INTRASYSTEM/CONNECTIONSERVICES should no longer be present, but a new one may have appeared:
ACCEPT:The IPv6 key is missing or expired. IPv6 Run-Time Key is required.The IPv6 key is actually not required, and the waiting entry should go away on its own after a few minutes. We will see in a later post how to suppress this message.
The default network configuration stored in the MCP virtual disk image establishes a private virtual network between the MCP and Windows environments on your workstation, termed the EVLAN. This network will not be visible to any external network. It uses standard TCP/IP APIs, but is implemented using message passing within your workstation's memory.
On the ODT, try sending the command below. IP address 192.168.16.6 is the default for the Windows side of the EVLAN:
NW TCPIP PING 192.168.16.6You should receive this response almost immediately:
TCPIP PING REPORT FOR NODE AT 192.168.16.6
NUMBER MESSAGES SENT 1
NUMBER MESSAGES RECEIVED 1
% PACKET LOSS 0
SENT FROM NODE AT "NULL"
On the Windows side, open a command-line window and enter this command:
ping 192.168.16.5This is the IP address for the MCP side of the EVLAN. You should receive a response like this:
Pinging 192.168.16.5 with 32 bytes of data:
Reply from 192.168.16.5: bytes=32 time=23ms TTL=64
Reply from 192.168.16.5: bytes=32 time=69ms TTL=64
Reply from 192.168.16.5: bytes=32 time<1ms TTL=64
Reply from 192.168.16.5: bytes=32 time=1ms TTL=64

Ping statistics for 192.168.16.5:
    Packets: Sent = 4, Received = 4, Lost = 0 (0% loss),
Approximate round trip times in milli-seconds:
    Minimum = 0ms, Maximum = 69ms, Average = 23ms
If both pings work, then it is highly likely that local networking has been set up and is working correctly. If one or both sides does not respond to the pings, there's a problem.
- Check that you have entered a valid MCP host name. Enter "
HN" by itself on the ODT to verify it. If necessary, set the host name as above and halt/load again. - Check the status of the MCP's Core Networking Services using the ODT command "
NW CNS". You should see the response "CNS is available". If you get an error response, or a response that indicates CNS is not running, try starting CNS manually with the ODT command "NW CNS+". - Check the status of the MCP's TCP/IP provider using the ODT command "
NW TCPIP STATUS". You should see a reply similar to the following, but the critical status is the first line, indicating that TCP/IP is "networking:"TCPIP IS CURRENTLY NETWORKING(IPV4-ONLY),RIP IS CURRENTLY ENABLED/RUNNING,TCPIP SECURITY IS CURRENTLY RUNNING,SSL IS CURRENTLY TERMINATED,IPSEC IS CURRENTLY DISABLED/NOT RUNNING,SSH IS CURRENTLY TERMINATEDIf you get an error response, or a response that indicates TCP/IP is not running, try manually starting it with the ODT command "NW TCPIP+".
Getting networking up and running has been a source of difficulty for many XE users, especially on Windows 10. Some recent Windows 10 updates seem to have improved the situation, though, particularly "Feature Update to Windows 10, version 1809." This update was originally released in October 2018, but then suspended due to problems. It was finally re-released starting in mid-November 2018. If you are reading this post shortly after that time, note that it may take some weeks for the update to be pushed out to all devices. If you are having problems, you may want to attempt to download and install the update manually.
If none of this works, then it's time to ask for help. You can write a comment against this blog post, but for networking issues it would probably be better to email the details of your problem to the blog editor at mcpinsider@unite.org. You may also want to consider posting your problem to the comp.sys.unisys newsgroup. Be aware that it is quite difficult to diagnose these types of problems remotely. It may take someone else multiple iterations to determine what the problem is and what to do about it.
Wrapping Up
Assuming that you can successfully ping the Windows and MCP environments from each other, then you can proceed to update both environments so that you can address one from the other using host names rather than IP addresses. The detailed instructions for doing this are in Section 3 of the Getting Started Guide, under the sub-section heading "Setting the MCP Host Name." That procedure will also show you how to access the MARC menus for COMS and from there access the CANDE timesharing system.
If you do not like the way the MARC terminal emulator window scrolls each time you transmit (I don't), you can turn that off temporarily by transmitting "?-S" from the home position of the window. In the next blog post, I will discuss configuration options for the MARC and ODT windows and show how to turn off scrolling permanently.
While you are in MARC or CANDE, it would be a good idea for you to change the password for the MCP's built-in ADMINISTRATOR account. From CANDE, enter the PASS command and follow the prompts. From MARC, do the following:
- Press Home to place the cursor in the Action field of any MARC form.
- Enter "
GO USER CHG" in the Action field and press Enter to transmit. The entry in this field is case-insensitive. - On the Password Changes form, enter option 4 (Substitute an existing password) or 5 (Replace a password list with a single password) in the Enter number or name field.
- Enter the original password for the
ADMINISTRATORin its field and your new password in both of the next two fields - Press Enter to transmit the form.
- Be sure you make a note of the new password.
By default, a password is case-insensitive unless you enclose it in double-quote characters ("). There is a system-wide security setting (using the SECOPT ODT command) that will cause all passwords to be treated as as case-sensitive.
At this point, you have a functioning, if somewhat limited, MCP environment. You can use CANDE to prepare programs and WFL jobs, run them, and inspect printer backup using the CANDE BACK command. Future posts will describe how to set up printers and alternative editing tools.
Shutting Down and Restarting MCP Express
When you are finished using MCP Express or want to shut down Windows, you should halt the MCP environment. In principle, when shutting down Windows, the MCP services should terminate automatically, but I prefer to shut down the MCP, ODT windows, etc., manually. The MARC and ODT windows can simply be closed, but of course first it would be best to save any CANDE workfile you have open and sign off. There are two ways to halt the MCP environment:
- Open the MCP Console from its icon on the Desktop if it is not already running. Click the Halt button on the Console's toolbar. Then close the MCP Console.
- I prefer to shut down the MCP from the ODT. To do that, enter the command "
POWER OFF SYSTEM" and press Enter. Then close the ODT window. If the MCP Console is open when you do this, you can just close it.
Either method will halt the MCP and place its components off line, but both will leave MCP Firmware Services running in the background. If you want to shut down XE completely, right-click on the MCP Express icon in the system tray after halting the MCP and select Stop Services.
The next time you want to use MCP Express, do the following:
- If you have rebooted Windows since the last time you used XE, right-click the MCP Express icon in the system tray to select Run as Administrator.
- If you have rebooted Windows or stopped Firmware Services since the last time you used XE, right-click the MCP Express icon in the system tray again and select Start Services.
- Finally, open MCP Console, click the Load button on its toolbar, and open the ODT window(s).
In the next blog post for the MCP Express series, I will describe some fine tuning you can apply to the MCP and to the MARC and ODT terminal emulator windows. I will also discuss some topics from Section 4 of the Getting Started Guide, including accessing MCP shared directories and installing a basic set of the MCP client applications. In the meantime, I highly recommend that you review the entire Section 4 in the Guide, if you have not done so already.


