
Thus far in this series on MCP Express, we have been setting up and using the MCP environment in an isolated mode. The MCP is able to communicate via TCP/IP internally with the local Windows environment and vice versa, but it is not yet capable of communicating on an external TCP/IP network. Configuring the MCP environment to work with an external network is the subject of this post.
As we will see, configuring TCP/IP for the MCP is quite a bit different than it is on most other systems. In fact, it's a little weird. You may have noticed some of this when following the directions in Section 3 of the MCP Express Getting Started Guide under the heading "Setting the MCP Host Name." The reason for the weirdness is historical, so I will start with a review of that history.
History
The original concept for mainframe communications was host-centric. All terminal devices connected directly to a single host, and all message traffic went through that host. Remember that this started when most organizations had only one computer system, terminals were dumb, and network circuits were even dumber. These were the days of RS-232, teletypes, and (for Burroughs systems) poll-select terminals like the TD800 series.
By the mid-1980s, Ethernet, LANs, and the precursors to the Internet were beginning to stand this host-centric approach to communications on its head. First the "Network Architectures" (e.g., SNA for IBM and BNA for Burroughs) turned the star-shaped mainframe networks into networks of stars, then smart terminals, PCs, and modern networking protocols got rid of the stars (i.e., the role of the mainframe as a central node) altogether and everything connected directly to a common network. The Internet is simply an extension of that trend, a network of networks.
BNA, the CP2000, and the NAU
The first implementation of TCP/IP for the MCP was a component of BNA (Burroughs Network Architecture) and ran inside a traffic concentrator/front-end processor known as the CP2000. An MCP system connected to a local CP2000 over an Ethernet LAN. The connection on the MCP side was handled by an I/O adapter known as the Inter-Connect Processor, or ICP -- a term still used today on MCP systems to refer generically to a host network adapter.
CP2000s could be connected with each other over local or wide-area links using BNA, and with other systems using protocols such as SNA and X.25. They could also serve as remote terminal controllers, for example, hosting multiple poll-select circuits and multiplexing the data onto a long-distance link back to one or more mainframe hosts.
The hosts and CP2000s of a BNA network are configured using a series of "initialization" or "INIT" files. These are simply card-image text files, usually of type SEQDATA on MCP systems. They have a free-form notation that is used to define network entities and the attributes of those entities. In a full BNA network with lots of hosts and CP2000s, there could be a lot of these files and a lot of cross references among them -- so many that there is an administrative tool, the NAU (Network Administrative Utility), to help create the files and maintain the relationships among them.
The NAU is a program with a MARC-like menu interface, backed by a DMSII data base. You use screen menus and forms to specify the network configuration, which is stored in the data base. When you have completed your definition of the network, or an update to that definition, the NAU extracts the configuration from the data base and creates the necessary INIT files, which can then be distributed over the network to the various nodes.
Fortunately, configuring TCP/IP for the MCP requires only two INIT files, and both are fairly simple. If you need only TCP/IP and none of the other BNA facilities, it is usually easier to ignore the NAU and maintain the INIT files manually. That is the approach I'll describe in this post.
Host-Resident TCP/IP and CNS
Having TCP/IP as part of BNA and running in the CP2000 must have seemed like a good idea at the time, because the CP2000 had a lot of infrastructure for networking and protocol conversion. There were two problems, though. First, the CP2000 was a fairly expensive device, and if all you wanted to do was TCP/IP, it was not a cost-competitive solution. Second, the CP2000 had a limited amount of memory, and thus could support only a limited number of TCP socket connections at a time -- a couple of hundred at most.
The problems with CP2000 cost and capacity prompted Unisys to completely redesign TCP/IP in the early 1990s and implement it within the MCP environment, providing a lot more memory for maintaining socket state and eliminating the need for the expensive CP2000. An ICP was still needed to connect to the external network, and TCP/IP was still part of BNA. That meant that the configuration and management components of BNA were still used for TCP/IP, and the configuration was done in BNA terms, not commonly-accepted TCP/IP terms. This initial orientation of TCP/IP to BNA is the source of the weirdness.
By the late 1990s, use of TCP/IP had spread widely throughout the installed base of MCP systems, and a lot of sites were using TCP/IP without any of the other BNA components. At that point, Unisys decided to split TCP/IP off from BNA. As part of that effort, it split the low-level management and control functions of BNA that both BNA and TCP/IP depend upon into a separate facility known as CNS (Core Networking Services). CNS provides the networking interface to the I/O subsystem and network adapters. BNA and TCP/IP then subscribe to CNS services for physical transmission and reception of data, and implement their protocols on top of the services that CNS provides. Thus, while TCP/IP is no longer dependent upon BNA, it is dependent upon CNS.
Hence the reason for needing two INIT files for TCP/IP -- one is for the CNS configuration and one is for the TCP/IP configuration. If you are also running BNA, then the CNS file will have additional entries to support BNA, and you will need additional INIT files to configure the BNA components.
Emulated MCP Systems and Shared Network Adapters
In 1996, Unisys introduced the first MCP systems where the architecture was emulated on Intel Pentium processors running Microsoft Windows. As part of that emulation, Unisys started using commodity PC network interface cards (NICs) rather than its proprietary ICPs. In this environment, a piece of Unisys software known as Janus sits between the commodity NIC driver and the Windows networking stack. Janus serves as a software router between the NIC, Windows, and the MCP. It allows both the MCP and Windows environments to share the same NIC and its connection to an external network. The MCP term for this arrangement is a "shared adapter." The software package that includes Janus and supports MCP use of commodity NICs is known as ClearPath Network Services or NX/Net.
This approach of using commodity NICs has become prominent, and is now used for all MCP systems. There is always some sort of Windows environment that drives the NICs, either an embedded computer appliance on older systems, a utility partition on the newer systems, or the host Windows system on the low end of the product line -- the NX4200, LX, Libra 300/400 series systems, and the MCP Software Series systems. That last is also the arrangement that MCP Express uses.
The final piece of background is that Unisys recently introduced an entirely new implementation of TCP/IP, known as TCPv3, which breaks further away from the BNA roots. This new implementation has an entirely different system of configuration and management. It is presently available only on systems that implement the I/O Architecture (IOA) -- currently the latest Libra 4000, 6000, and 8000-series. It cannot be used with MCP Express, so for our purposes you can ignore any references to it.
Prepare for External Networking
To prepare MCP Express for external networking, there a few requirements that must be met.
First, you will need to assign at least one static IP address for the MCP environment on your local subnet. Your host Windows environment likely has a dynamic IP address assigned through the Dynamic Host Control Protocol (DHCP), which it can continue to use. The MCP Express environment, however must use static IP addresses. You may see references to DHCP in the MCP networking documentation, but as with TCPv3, this is presently available only for Libra 4000, 6000, and 8000-series systems. The easiest thing for most home and small office networks is simply to pick an address outside the range your local subnet's router has set aside for DHCP and assign that address to the MCP.
Second, you must use IPv4. The MCP has support for IPv6, but this is not available in MCP Express. You will recall that a warning for a missing IPv6 key appears on the ODT after a halt/load. One of the things we will do as part of configuring external networking is suppress that warning.
Third, you will need to use a wired connection to your local subnet. MCP Express does not support wireless adapters.
When MCP Express was installed, a utility named the NIC Configuration Manager was also installed, and an icon for it placed on your Windows Desktop. This utility is used primarily to establish adapter teams (multiple physical network adapters working in parallel as one virtual adapter) and is normally not required with MCP Express. You can ignore this utility and delete its icon from the Desktop if you wish.
Enable a Network Adapter
To enable a network adapter for MCP use with an external network, the emulated hardware configuration (the Peripheral Configuration Diagram or PCD) for MCP Express needs to be modified. That means you need to modify the active PCD, which means using the System Editor, which in turn means the MCP environment cannot be running. If it is, shut it down, either by entering POWER OFF SYSTEM on the ODT or by clicking the Halt button on the toolbar of MCP Console. Then click the System Editor button on the toolbar of MCP Console.
Inside System Editor, click the Active button on its toolbar to open the currently-active PCD. If System Editor displays a dialog box to adjust resources, check to see if your network adapter is being added, and if so accept that change. Normally, though, you should just cancel that dialog. In the left-hand pane of the System Editor window, you should see something similar to this:
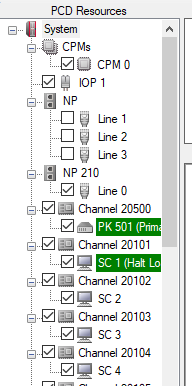
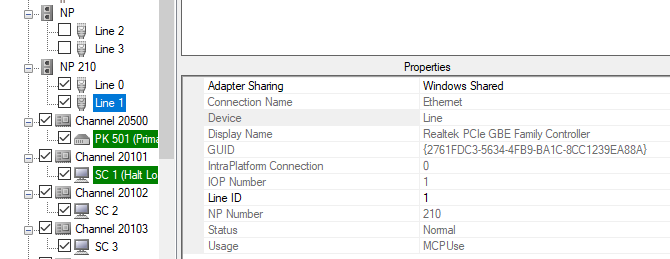
The "NP" nodes refer to emulated Network Processors. Note under the NP 210 node there is a Line 0 node that is ticked, indicating it is part of the current configuration. Line 0 represents the adapter for the internal EVLAN that was configured automatically when MCP Express was installed. Also note under the NP (with no number) node there is a node labeled Line 1, and possibly nodes labeled Line 2 and Line 3. If you click those nodes, information about them will appear in the right-hand pane. The important things to examine in the right-hand pane are the "Connection Name" and "Display Name" entries. From that, you should be able to determine if the node is for a wired (Ethernet) adapter, a wireless adapter, or perhaps one for Bluetooth.

On my laptop, as shown above, Line 1 is the wired Ethernet adapter -- GBE stands for Gigabit Ethernet. On another one of my systems, Line 2 is the wired adapter. This can vary from system to system, so examine the properties of each line carefully. Next, using your mouse, select the node for the wired adapter and drag it onto the NP 210 node. Then tick the box next to that adapter node. You will note that this causes three of the properties for that adapter to change:
- Adapter Sharing changes from "N/A" to "Not Shared." Click on that property value and select "Windows Shared" from its pull-down list. This setting allows Windows and the MCP to share the same physical adapter. If you have multiple wired adapters on your system, you can optionally leave this setting at "Not Shared" on one of them, meaning the MCP will have exclusive use of that network interface and it will be unavailable to Windows. Windows will then need to use some other adapter.
- NP Number changed from 0 to 210.
- Usage changed from "NonMCPUse" to "MCPUse."
Also note the value of the "Line ID" property. It is usually a 1 or a 2. We will need that number when preparing the CNS INIT file. On my laptop, the result now looks like this:
While we are in System Editor, recall that after a halt/load you have seen waiting entries on the ODT similar to "SC3 is not connected to CHAN 20103." This is because SC 3 and SC 4 are enabled in the PCD, but we do not have WebStation ODT windows running for them. You probably do not need more than two ODT windows, so the easiest way to eliminate those waiting entries for good is to untick the boxes next to the SC 3 and SC 4 nodes on the PCD, removing them from the active configuration. You can also untick the corresponding Channel nodes, but that is not necessary.
The next step is to save the new configuration. I strongly recommend that you do a Save As... and give the updated PCD file a different name. This will allow you to fall back to the prior configuration in case there is a problem. I like to put the date in the PCD file name. On the dialog box where you save the file, there is a text box where you can enter a comment describing the reason for the configuration change.
Once the PCD is saved, click the Set Active button on the System Editor toolbar to make this the active PCD. Then close System Editor.
Load the MCP
The next steps require the MCP, so click the Load button on the MCP Console toolbar and open the ODT windows. If after the load you get a waiting entry on the ODT similar to this:
 2506/ 2506 80 3:50 Job DISPLAY_CONFIG_ERRORS
CONFIGURATION PERIPHERAL ERRORS FOUND DURING INITIALIZATION
enter a <mix>Y command on the ODT (e.g., 2506Y) to see the reason. If the response contains a line similar to this:
Display: **ERROR** SC 3-4: NOT AVAILABLE FOR USEthen the error is due to removing SC 3 and SC 4 from the PCD. This is benign, and the MCP is simply reporting that it formerly had these units in its configuration but they are no longer present. Enter <mix>OK to dismiss the message. The MCP will adjust its record of available peripheral devices, and you should not see this message again.
Update the CNS INIT File
The next step is to assure the configuration in the CNS INIT file aligns with the new PCD. Open the MARC window, sign on with the administrator account, and switch to CANDE. Refer to Section 3 of the MCP Express Getting Started Guide under the heading "Setting the MCP Host Name" for details if necessary. If you would rather use PWB or the ClearPath Visual IDE to edit the files, feel free to do so.
On the ODT, enter the command NW CNS. You should see a response similar to this:
CNS is available
NEXT INIT/INFO FILE WILL BE CLEARPATH/INIT/CNS.
This tells you the name of the current INIT file for CNS, i.e., the one that will be used the next time CNS is initialized. Open this file in CANDE or your editor. Ignoring the large comments at the front and back of the file, lines 3100-7200 should look similar to this:
%%%%%%%%%%%%%%%%%%%%%%%%%%%%%%%%%%%%%%%%%%%%%%%%%%%%%%%%%%%%%%%%%%%%%
%  Host Attributes
%%%%%%%%%%%%%%%%%%%%%%%%%%%%%%%%%%%%%%%%%%%%%%%%%%%%%%%%%%%%%%%%%%%%%
NW AUTHORIZE *DEFAULT                               = NETWORKCONTROL;%
NW AUTHORIZE ADMINISTRATOR AT MCPHP14               = SECURITY;%
%%%%%%%%%%%%%%%%%%%%%%%%%%%%%%%%%%%%%%%%%%%%%%%%%%%%%%%%%%%%%%%%%%%%%
%  Add Connection Group for NX/Network Services NP 210 Line 0
%  This group is for EVLAN.
%%%%%%%%%%%%%%%%%%%%%%%%%%%%%%%%%%%%%%%%%%%%%%%%%%%%%%%%%%%%%%%%%%%%%
NW ADD CONNECTIONGROUP CG_ICP_2100%
   %   Connection Group Information
       (  TYPE                      = LAN% <
        , ICPDEVICEID               = 210%
        , LINEMODULEID              = 1%
        , LINEID                    = 0%
        , SPEED                     = 100000000%
        , LOCALADDRESS              = *DEFAULT%
        , MAXINPUTMESSAGESIZELIMIT  = 4352%
        , MAXOUTPUTMESSAGESIZELIMIT = 4352%
        , MAXINPUTMESSAGESIZE       = 4352%
        , MAXOUTPUTMESSAGESIZE      = 4352%
       )%
;%
%%%%%%%%%%%%%%%%%%%%%%%%%%%%%%%%%%%%%%%%%%%%%%%%%%%%%%%%%%%%%%%%%%%%%
%  Add Connection Group for NX/Network Services NP 210 Line 2
%  This group is for an MCP connection to the site's corporate LAN.
%%%%%%%%%%%%%%%%%%%%%%%%%%%%%%%%%%%%%%%%%%%%%%%%%%%%%%%%%%%%%%%%%%%%%
NW ADD CONNECTIONGROUP CG_ICP_2102%
   %   Connection Group Information
       (  TYPE                      = LAN%
        , ICPDEVICEID               = 210%
        , LINEMODULEID              = 1%
        , LINEID                    = 2%
        , SPEED                     = 1000000000%
        , LOCALADDRESS              = *DEFAULT%
        , ADAPTERTYPE               = GIGABIT%
        , MAXINPUTMESSAGESIZELIMIT  = 1500%
        , MAXOUTPUTMESSAGESIZELIMIT = 1500%
        , MAXINPUTMESSAGESIZE       = 1500%
        , MAXOUTPUTMESSAGESIZE      = 1500%
       )% <
;%
%%%%%%%%%%%%%%%%%%%%%%%%%%%%%%%%%%%%%%%%%%%%%%%%%%%%%%%%%%%%%%%%%%%%%
%  End Initialization
%%%%%%%%%%%%%%%%%%%%%%%%%%%%%%%%%%%%%%%%%%%%%%%%%%%%%%%%%%%%%%%%%%%%%
NW CNS ENDINIT;%
This is the running CNS configuration for your system. The attribute values specified in this file are critical to both TCP/IP and the network adapters working properly, so you should not change them other than specified below unless you really know what you are doing. The NW commands are described in the Networking Commands and Inquiries Help document. The networking entities and attributes used in those commands are described in the Networking Attributes Data Dictionary Help document.
MCP networking operates using tables in memory. The ODT commands that begin with NW establish and manipulate these tables. The INIT files for CNS and TCP/IP are nothing more than scripts of these commands to create an initial configuration. You can modify many elements of the running configuration dynamically by entering NW commands on the ODT, but the running configuration (including the configuration initially loaded from INIT files) is lost whenever the system is halt/loaded or the networking software is restarted. The INIT files are simply the way the system automatically establishes an initial configuration when networking is initialized.
You should have already updated the NW AUTHORIZE command at line 3500 when you initially set up MCP Express. You may delete the large blocks of comments (lines beginning with "%") at the start and end of the file if you wish, but be sure to preserve the NW CNS ENDINIT; command at the end of the file.
You may have noticed that most of the lines have a "%" comment delimiter as the last non-blank character on the line. These are an artifact of the way the NAU generates the files, and the trailing "%" characters are not necessary. They were probably there originally to decrease the parsing overhead when INIT files were loaded by CP2000s, but that overhead is negligible on MCP systems. You may delete the trailing "%" characters if you wish.
For the purpose of TCP/IP networking, the only thing the CNS INIT file does is create CONNECTIONGROUP entities. In BNA terms, a CONNECTIONGROUP is equivalent to a physical communications circuit or line. For example, a poll-select circuit would have been represented as a CONNECTIONGROUP and all of the stations connected to one circuit would have belonged to the same group. In modern networking terms, a CONNECTIONGROUP represents a network adapter. Thus, the commands in this file define the physical (or in the case of the EVLAN, virtual) network connections to the system.
A CONNECTIONGROUP is distinguished by the ICPDEVICEID (NP unit number) and LINEID attributes. These must match the corresponding values for an NP and Line ID in the PCD. MCP Express systems typically have only one NP/ICP device, numbered by convention as 210. LINEID 0 is always reserved for the internal EVLAN connection between the Windows and MCP environments on the host system. Physical LAN connections are always numbered starting at 1.
Notice that the first CONNECTIONGROUP in the INIT file is for LINEID 0, and is thus for the EVLAN. Therefore, the second group will be the one for your external network adapter.
Carefully check the correspondence between the Line ID you noted for the adapter you added to the PCD with the LINEID attribute in the second CONNECTIONGROUP. If they are the same, you are done and no further changes to the file are necessary. If they are different, change the value in the INIT file to match that in the PCD. You should also change the name of the CONNECTIONGROUP to match, as discussed next.
There is an optional change to this file that I would recommend, if only to make things a little easier to understand and remember. The CONNECTIONGROUP names are of the pattern CG_ICP_nnnl, where nnn is the NP/ICP number and l is the LINEID. This is another artifact of the way the NAU generates INIT files. For a simple configuration like this one, I like to name these using the pattern NPnnn_LINEl. To me, that makes more sense and is easier to remember, especially when we get to the TCP/IP configuration.
Using my naming pattern, the first group in the file above would be named NP210_LINE0 and the second one would be NP210_LINE2. Whatever naming convention you choose, if you change the LINEID attribute, you should also change the CONNECTIONGROUP name to match.
If you have made changes to the CNS INIT file, save the file. As with the PCD files, it is a good idea to save changes to the configuration under a different file name so that you can fall back to the prior version in case something goes wrong. Once again, I like to put the date in these file names. In CANDE, since these files usually reside under the global (*) directory, you will need to use a command similar to:
SAVE AS *INIT/CLEARPATH/CNS/20190415 OVERRIDEThe OVERRIDE option allows you to save a file with the same name as one that already exists. The existing file will be replaced. Of course, you can save files into the global directory only if you have privileges to do so, which is why these configuration edits should be done under a privileged usercode such as ADMINISTRATOR.
My preference is to use the MCP host name as the first node of networking configuration file names, and save files in this form:
SAVE AS *MCPHP14/INIT/CNS/20190415 OVERRIDEThis completes the changes to the CNS INIT file. The final file I prepared for my system looks like this: MCPHP14.INIT.CNS.20190429.sqd_m.
Update the TCP/IP INIT File
The TCP/IP INIT file is modified in a manner similar to the CNS file. The most important things that need to be done for TCP/IP are:
- Setting the correct IP address and mask for your local subnet.
- Setting the default TCP/IP host name.
- Adding TCP/IP
CONNECTIONentities to the CNSCONNECTIONGROUPentities. - Defining a default route so that the MCP will be able to communicate outside your local subnet.
On the ODT, enter the command NW TCPIP. You should see a response similar to the following, showing the name of the current file:
TCPIP is available NEXT INIT/INFO FILE WILL BE CLEARPATH/INIT/TCPIP.Open the specified file in CANDE or your editor. Ignoring most the comment lines in the file, it should look similar to this:
%%%   NW TCPIP OPTION + IPV4ONLYOPERATION;%
 NW TCPIP TCPIPIDENTITY ADD NP 210 LINE 0%
            192.168.16.5/30 VISIBLE -;%
 NW TCPIP TCPIPIDENTITY ADD NP 210 LINE 2%
            192.168.237.50/24 VISIBLE +;%
 NW TCPIP TCPIPHOSTNAME MCPHP14.DIGM.COM;%
 NW TCPIP OPTION - USERFCMTU;%
 NW ADD CONNECTION TO CG_ICP_2100%
           2100_TCPIP_2100%
    %   Connection Information
           (  NETWORKLAYERENTITY         = IP%
            , REMOTEADDRESS              = 000000000000%
            , CLASS                      = CLASS_1%
            , FRAMETRACE                 = FALSE%
            , RETRYLIMITXID              = 10%
            , MAXINPUTMESSAGESIZELIMIT   = 4352%
            , MAXOUTPUTMESSAGESIZELIMIT  = 4352%
            , MAXINPUTMESSAGESIZE        = 4352%
            , MAXOUTPUTMESSAGESIZE       = 4352%
           )%
 ;%
 NW ADD CONNECTION TO CG_ICP_2102%
           2102_TCPIP_2102%
    %   Connection Information                                          %
           (  NETWORKLAYERENTITY         = IP%
            , REMOTEADDRESS              = 000000000000%
            , CLASS                      = ETHIP%
            , FRAMETRACE                 = FALSE%
            , RETRYLIMITXID              = 10%
            , MAXINPUTMESSAGESIZELIMIT   = 1500%
            , MAXOUTPUTMESSAGESIZELIMIT  = 1500%
            , MAXINPUTMESSAGESIZE        = 1500%
            , MAXOUTPUTMESSAGESIZE       = 1500%
           )%
 ;%
 %%%NW TCPIP ROUTE ADD DEFAULT 192.168.237.250 %
 %%%   PREF 1;%
You will need to make several changes and additions to this file to prepare it for your local network.
- The
NW TCPIP OPTION + IPV4ONLYOPERATION;%command shown near the front of the file is commented out. If you uncomment it by removing the leading "%" characters, this will set that option and instruct the TCP/IP software that it is to enable only the IPv4 protocol. That will eliminate the annoying waiting entry for the missing IPv6 key that appears after a halt/load. Note that setting or resetting this option must be the first command in theINITfile. Also note that for this command (and this TCP/IP command only), the semicolon (;) must be followed by a "%" character, otherwise a syntax error will occur. Thus, if you choose to remove the trailing "%" from the lines in the file, this "%" must remain in place. That odd requirement is probably a result of special checking for the presence of this command at the start of the file. - The
TCPIPIDENTITY(orIDENTITYorID) commands assign IP addresses and network masks to network adapters. A single adapter may be assigned up to 32 addresses.- IP address 192.168.16.5 is the address for the internal EVLAN. The settings for this adapter should not be changed.
- The 192.168.237.50/24 address and mask is the default for the external subnet, which you will need to change to the static address you have chosen for MCP use and the network mask for your local subnet. On my network, it would be 192.168.152.172/24.
- The
LINEattribute must match the Line ID for the adapater in the PCD and theLINEIDattribute for theCONNECTIONGROUPin the CNSINITfile. If you changed the CNSLINEID, you will need to change it here as well to match. - The
VISIBLEattribute controls the visibility of IP addresses to MCP software. It should be "-" for the EVLAN and "+" for external connections.
- The
TCPIPHOSTNAME(orTCPIPHN) command specifies the default TCP/IP host name for the system. You may have already modified this command when first configuring TCP/IP for internal networking. This is in the usual DNS format as one or more names delimited by periods (.). Each name node must begin and end with a letter or digit, but internally a name may also contain "-" and "_" characters. Maximum total length is 63 characters. Unisys recommends that the first node of this name match the host name for the system specified by the ODTHNcommand. The remaining nodes should match the domain name for your subnet, if any. - The
OPTION - USERFCMTUcommand suppresses enforcement of the RFC 1122 Maximum Transmission Unit (MTU), which restricts packets to 536 bytes. With this option reset, TCP/IP will use the maximum transmission size configured for the connection, typically 1500 bytes for Ethernet subnets. You should leave this option set only if devices on your network are constrained to use the RFC MTU size. - The
ADD CONNECTIONcommands enable TCP/IP on specificCONNECTIONGROUPs that were previously defined in the CNSINITfile. The syntax isADD CONNECTION TO<group name> <connection name>. As in CNS, the funky names are due to the way the NAU generatesINITfiles. The pattern is nnnl_TCPIP_nnnl, where nnn is the NP number and l is theLINEID. I prefer a naming convention ofTCPIP_NPnnn_LINEl. You should not normally change any of the attributes for these connections, but make sure that theCONNECTIONGROUPnames match those in the CNSINITfile. - The
ROUTEcommand at the end of the example above is commented out, but unless you are planning to have the MCP communicate only on your local subnet, you will need to uncomment this and modify it. TheROUTEcommand is used to establish static routes for MCP TCP/IP. In this case, you will use it to establish a default route. This is the destination to which the MCP will send any traffic that it does not know how to route. This traffic will be destined for a different network, so normally you need to route it to the gateway router on your local subnet.
- Change the IP address in the command to that of your router. Do not specify a network mask.
- The
PREFattribute specifies the relative priority of this default route with respect to any other default routes that have been specified. Lower numbers are higher priority. Specifying a preference of1is okay if you have only one router, but that makes dynamically adding a higher-priority route difficult later should that become necessary. I usually specify the preference as10or20.
Optional TCP/IP Configuration
With the changes above the TCP/IP INIT file should be usable, but I like to add a few more settings to improve robustness and efficiency. You may skip this entire section if you wish. These settings are intended for small, simple networks where the MCP environment is relatively static. You may wish to change or eliminate some of these, and all of them are optional. There are quite a few more settings available like this, which you can read about in the TCP/IP Implementation and Operations Guide. The settings can go anywhere in the file.
NW TCPIP MAPPING + DIGMHP14 192.168.16.6;
NW TCPIP MAPPING + MCPD83A  192.168.152.170;
NW TCPIP MAPPING + MCP7520  192.168.152.175;

NW TCPIP OPTION - USERFCACKSTRATEGY;
NW TCPIP OPTION + ISSUEICMPRESET;
NW TCPIP OPTION - LANRESIL;
NW TCPIP OPTION - WAITFORHN;
NW TCPIP OPTION + CACHELEARNEDMAP;
NW TCPIP OPTION + UPDATEYHBYLEARNED;
NW TCPIP OPTION + DYNAMICPORTFILTER;
NW TCPIP OPTION - SSL;
NW TCPIP BROADCASTFILTER DISABLE;
NW TCPIP DYNAMICINIT DISABLE UDP ALL;
NW TCPIP DYNAMICINIT DISABLE TCP ALL;

NW SNMP SET TCPMAXCONNECTIONS = 1024;
NW SNMP SET IPFORWARDING = DISABLED;
NW SNMP SET RIPENABLED = DISABLED;
NW SNMP SET ICMPLIMITEDBCAST = DISABLED;
NW SNMP SET ICMPRDISCPERFORM 192.168.152.171 = DISABLED;
NW SNMP SET IPMASKCONFIG 192.168.152.171 = STATIC;
The MAPPING commands map a host name to an IP address. Collectively, they act like a "hosts" file in Windows or Linux, allowing MCP applications to address external servers by name rather than IP address. A host name may have multiple addresses. We will discuss in a later post how to set up DNS name resolution for the MCP so that it can connect to an external DNS server.
One useful thing is to include a MAPPING command for the Windows EVLAN address, as shown in the first command above. This allows MCP applications to connect easily to the Windows side of your system over the EVLAN, which is more efficient than connecting using an external network address. Additional MAPPING commands may be added for other hosts in your subnet or on the Internet.
The OPTION commands do the following:
-USERFCACKSTRATEGY-- RFC 1122 requires that a sender force a receiving system to send an ACK after at least every two MTUs of data. Resetting this option improves performance. This option is reset by default, but it is good to document the setting in the configuration.+ISSUEICMPRESETcauses the MCP to use RFC 1122 rules for handling ICMP packets. Resetting this option enables security features in the MCP that can help protect against ICMP attacks. For MCP Express on a small network, you probably do not need that. The option is enabled by default.-LANRESILturns off the LAN Resiliency feature of MCP TCP/IP. This allows TCP dialogs to be transferred to another connection in case of an adapter failure. There is overhead to setting up such dialogs, and it's another thing you probably do not need with MCP Express. This option is set by default.-WAITFORHNdisables the wait for resolving the host name of the remote system when opening a dialog. This usually allows dialogs opened by MCP applications to be available to the application more quickly. The downside is that the port file attributesYOURHOSTandYOURDOMAINNAMEmay not have useful values until the resolution completes some time later. The default for this option is reset.+CACHELEARNEDMAPcauses the MCP to add entries to the memory-resident mapping table (as ifNW TCPIP MAPPING ADDcommands had been done) when the MCP learns of a mapping between a host name and an IP address. The default for this option is reset.+DYNAMICPORTFILTERcauses the Network Services software running on the Windows side of the system to trap and discard incoming packets addressed to a socket. This eliminates the overhead of the MCP having to reject the packet. The default for this option is set.-SSLdisables SSL/TLS support in TCP/IP. Unless you are actually planning to configure and use SSL/TLS for MCP connections, this option should be reset. The default for this option is reset.-SSHdisables Secure Shell support in TCP/IP. As with SSL, unless you are planning to use SSH, this option should be reset. The default for this option is reset.
BROADCASTFILTER DISABLE turns off filtering for broadcast packets, something you probably do not need to worry about with MCP Express.
DYNAMICINIT DISABLE inhibits the ability for incoming TCP and UDP packets to initiate certain system services if they are not currently running. For example, by default, an incoming packet for port 80 will initiate the MCP web server. Disabling dynamic initialization prevents that from happening and reduces the overhead in the handling of incoming packets. One downside of this is that it may prevent MCP services such as PWB (NX/Edit) from initiating automatically. They can be initiated manually using an NA ODT command, e.g., NA NXEDIT+.
There are several TCP/IP-related options that can be set through the SNMP interface:
TCPMAXCONNECTIONSspecifies the maximum number of socket connections that can be in use at any one time. I set this to 1024 or so on small systems. The system limit is 65K.IPFORDWARDINGcontrols whether MCP TCP/IP will route packets between adapters for different networks on the same system. Normally you don't want to use the MCP system as a router, and if you have only one adapter it cannot happen anyway, so I always disable this.RIPENABLEDcontrols whether the Routing Information Protocol (RIP) is active for the MCP. This is seldom needed on a small local network, so I usually disable this as well.ICMPLIMITEDBCASTshould be set to prevent possible flooding of the network when a link using router discovery is configured with a broadcast address and you have routers that retransmit limited broadcast messages. This is seldom an issue on small networks, but it is a good idea to set this option anyway.ICMPRDISCPERFORMcontrols whether the MCP will send router discovery solicitation messages. This is another feature that is seldom needed on small networks. The IP address in the command is that of your external adapter, as specified in theTCPIPIDENTITYcommand.IPMASKCONFIGset toSTATICinhibits the MCP from exchanging network mask information with other hosts on the network. The IP address in this command is also that of your external adapter. This is yet another feature that is seldom needed on small networks.
After completing the necessary changes to the file, carefully check your work, as networking will be down shortly and correcting errors is difficult without access to CANDE or an MCP editor. When ready, save the TCP/IP INIT file as you did for the CNS file, preferably under a different name than the original TCP/IP file, e.g.,
SAVE AS *MCPHP14/INIT/TCPIP/20190429 OVERRIDEThis completes our initial configuration for external networking. The final TCP/IP INIT file for my system looks like this: MCPHP14.INIT.TCPIP.20190429.sqd_m.
Implement the New Configuration
Now that you have INIT files customized for your system and subnet, you need to establish those files as the running configuration. There are three steps to this:
- Specify the files as the new configuration.
- Shut down TCP/IP and CNS.
- Restart CNS and TCP/IP.
Steps 2 and 3 can be accomplished simply by doing a halt/load, but it will be useful for you to know how to stop and restart the networking providers gracefully. When doing all of the steps, numbers 1 and 2 can be done in either order.
Recall from above that we determined the current name of the CNS INIT file by entering a NW CNS command on the ODT. A variant of this command is used to designate a new file. Using the file with my naming convention, it would be:
NW CNS = *MCPHP14/INIT/CNS/20190429 ON DISKI recommend that you specify the file title with a leading "*" to indicate the file resides in the global directory. I also recommend you specify the family name at the end (e.g., ON DISK). Similarly, the new TCP/IP file can be specified using my naming convention as this:
NW TCPIP = *MCPHP14/INIT/TCPIP/20190429 ON DISKThese new settings will take effect the next time that networking is started. They also will be remembered across a networking restart or a halt/load.
Next, initiate shutdown of TCP/IP with the following command. Note that this will disconnect any MARC, CANDE, or PWB connections you may be using and abort any associated sessions.
NW TCPIP-You will see a few of the networking services show up in the Waiting Entries on the ODT, along with messages similar to these:
NW 15:45 DUE TO NLE REQUEST
NW 15:45 TO IP
NW 15:45 CONNECTION CLOSED FOR CONNECTION 2100_TCPIP_2100
NW 15:44 PHASE CHANGED FOR TCPIP FROM NETWORKING TO TERMINATING
Wait a few seconds until you see an EOJ in Completed Entries for the job STOP/TCPIP, then initiate shutdown of CNS:
NW CNS-You will then see quite a few more messages display. Wait until you see an EOJ in Completed Entries for the job STOP/CNS. This may take about a minute. Networking is now completely shut down. To restart it, make sure you have specified the new INIT file names, then enter these commands on the ODT:
NW CNS+
NW TCPIP+
You can enter these commands one after the other without waiting between them. The MCP networking software will parse the respective INIT files and load their configuration. Keep an eye out for messages and Waiting Entries indicating there is a syntax or semantic error in the files. You can get more information about an error by entering <mix>Y, using the mix number of the waiting task entry. If an error occurs, shut down the affected provider with a "-" command, correct and save the file, then restart the provider with a "+" command.
Correcting an error at this point is a bit problematic, as networking is not yet operational, so you will not be able to use the MARC window on your desktop or another editor, such as PWB. One option would be to shut down both providers, switch back to the original configuration files, and restart networking the way it was originally, but that can be tedious.
Another approach is to use the MARC interface that is built into the ODT. To do that, enter a ??MARC command on one of the ODTs. It will stop working as an ODT and should display a MARC log-on form. Log on with your administrator usercode and password, switch to CANDE as you would for a regular terminal and make the necessary corrections to the file in error. After saving the file, transmit the command ??ODT, which will switch the window back to ODT mode. The MARC session will continue to run in the background, and you can continue to switch modes using the ??MARC and ??ODT commands.
If CNS and TCP/IP initialize cleanly, the initialization process should complete with a series of messages similar to the following (shown most-recent-first as they would be on the ODT):
* 3761 16:40 NAMESERVER:Announcing to 192.168.152.172/192.168.152.255
* 3761 16:40 NAMESERVER:Datagram port opened successfully
* 3761 16:40 NAMESERVER:Registration successful
* 3761 16:40 NAMESERVER:Registering via BMODE (no viable WINS server exists)...
* 3761 16:40 NAMESERVER:Initialization complete
* 3761 16:40 NAMESERVER:NameServer port opened successfully
* 3761 16:40 NAMESERVER:IP addr/subnet 192.168.152.172/255.255.255.000
* 3761 16:40 NAMESERVER:Using domain name PARADIGM
3761 16:40 NAMESERVER:Using host name MCPHP14
NW 16:40 TO IP
NW 16:40 CONNECTION OPENED FOR CONNECTION TCPIP_NP210_LINE1
NW 16:40 CONNECTION INITIATED FOR CONNECTION TCPIP_NP210_LINE1 TO IP
As a first test, try pinging the Windows side of the system from the ODT to make sure that still works:
NW TCPIP PING 192.168.16.6Then try pinging some known IP address on your local subnet, such as the address for your router, e.g.,
NW TCPIP PING 192.168.152.1Also try pinging the MCP from the Windows side of the system, and if you can, ping the MCP's external IP address from some other system on your local subnet. If all that works, then external networking is functioning properly. Note that you will not be able to ping DNS host names from the MCP just yet, unless you have included them in NW TCPIP MAPPING commands in the TCP/IP INIT file. The additional setup to support DNS resolution will be covered in a future post.
If you uncommented the NW TCPIP OPTION + IPV4ONLYOPERATION command in the TCP/IP INIT file, you should also notice that the warning about a missing IPv6 key now no longer appears.
Troubleshooting
Problems with getting TCP/IP networking set up and running have been one of the most common issues for MCP Express I have seen over the past two years in posts on the comp.sys.unisys newsgroup. One of the motivations behind starting this blog has been the frustrations people have had with MCP Express networking . Hopefully the discussion and details in this post will help you in the future, but there is no guarantee that everyone is going to get it right the first time. If you have tried to follow the instructions in this series of blogs and are still having problems with networking, this section will give you some things to try.
- Make sure you are on the latest Windows updates. For Windows 10, this is especially important. There were significant changes in "Feature Update to Windows 10, version 1809," which started rolling out in October 2018 and recently received a cumulative update, so make sure that is installed. I will note, though, that my Win10 Home laptop is running version 1803, and I have not had any problems.
- Carefully review using System Editor that the NP Line attributes in the PCD (NP number and Line ID) match the corresponding
ICPDEVICEIDandLINEIDin the CNSINITfile. - Carefully review that the
CONNECTIONGROUPnames in your TCP/IPINITfile match those in the CNSINITfile. - Check all other changes you made in the
INITfiles, especially the IP addresses and subnet masks. - On Windows 7, I have had problems in the past with the "Unisys Network Services Protocol Driver #1" component not being selected in Windows for the external network adapter. From the Windows Control Panel, select Network and Internet and then select Network Connections. Right-click on the Ethernet adapter, select Properties, and verify that the Unisys driver is ticked.
- If you can ping from Windows to the MCP over the EVLAN (192.168.16.5) but not from the MCP to Windows (192.168.16.6), check the Network Category in the Network Connections applet mentioned above. You can also see this on the Network and Sharing Center applet. The MCP adapter will probably show as "Unidentified network" and as a Public network rather than a Private, Home, or Work network. If it shows as Public, try this:
- Run Windows Powershell as an administrator.
- Enter this command:
Set-NetConnectionProfile -InterfaceAlias "<EVLAN name>" -NetworkCategory Private
where <EVLAN name> is the name of the network connection with the Device Name "Unisys Network Services EVLAN TCP Adapter." This is often "Local Area Connection 3" on Windows 7 and "Ethernet 3" on Windows 10. - Refresh the Network Connections or Network and Sharing Center applet to see if the Network Category has changed.
- If nothing else works, it may be time to try uninstalling and reinstalling MCP Express. I recommend that you do this only as a last resort. You will need to do a full uninstall (chose the "Programs and Data" option when uninstalling using MIM), which will delete the contents of MCP family
DISK. Thus, you need to save everything you want to keep from the disk unit and restore it later. As an alternative, you can save and reinstate the entire disk:- Make sure you have sufficient disk space on your Windows system -- at least 20GB, because for a short time it will need to have space for two copies of the logical disk file for family
DISK. - Make sure the MCP environment is completely shut down.
- In the directory you set up for MCP logical disks when you installed MCP Express, change the name of the file
diskxxx.asdto something else. It can keep the.asdextension. - Now fully uninstall MCP Express, selecting Programs and Data during the Uninstall – Remove Options dialog. Since you changed the name of your logical disk file, it will not be removed.
- Reboot your Windows system.
- Reinstall MCP Express, following the instructions in the ClearPath MCP Express Getting Started Guide and earlier posts in this blog series.
- After installation, but before starting the firmware services or halt/loading the MCP, remove the new
diskxxx.asdfile created by the install and rename the former file back todiskxxx.exe. - Now start the firmware services and load the MCP. All of your former files should still be in place.
- Make sure you have sufficient disk space on your Windows system -- at least 20GB, because for a short time it will need to have space for two copies of the logical disk file for family
In the next blog post in this series, we will continue working with the connection to an external network, configuring some additional TCP/IP features of the MCP.
Great article Paul and very helpfull. I have managed to get TCPIP networking up and running going through the article step-by-step. A lot of work but in the end it was all running.. that is, except for one thing : Very frequently my system goes into a BSOD due to a problem with Janus.sys IRQL_NOT_LESS_OR_EQUAL which forces the entire system to reboot.
I am running MCP Express on a Dell laptop with Windows10 (64bit). Any suggestions on how to fix this or do more research ?
Thanks. I’m glad the post was helpful to you.
I have also experienced the Blue Screen IRQL_NOT_LESS_OR_EQUAL problem. It has been very frustrating. It appears to be some incompatibility between the later versions of Windows 10 and the Unisys NX/Net software that integrates MCP TCP/IP with the Windows network stack. I have not been able to get networking for MCP Express to work reliably on any version of Windows 10 after release 1803, which went off support this past December.
I run the full-blown Developer Studio Personal Edition product on a separate Windows 10 laptop, and it had the same problem after upgrading to Win10 1903 early this past Fall. The solution to that problem was to upgrade the MCP firmware to version 2.1. That upgrade provided the new TCPv3 implementation of MCP TCP/IP, which works fine with Win10 1903 and 1909, and in addition is much faster and simpler to configure.
Alas, there’s no way to upgrade the firmware for MCP Express. The only alternatives I know of at present are to:
* Fall back to Win10 release 1803 (which is no longer supported by Microsoft), or
* Run MCP Express on Windows 8.1 or Windows 7 (of course, Win7 went off support just this week), or
* Pay about $1000 USD per year to license Developer Studio.
Sorry — I know that none of those are very attractive options. We are probably stuck with this situation until Unisys releases a version of MCP Express that supports TCPv3, but I suspect that will not happen until August 2020. Paul
I ran into this after Windows automatically upgraded to 1903, before which I had an MCP XE installation that was working fine. After, MARC ceased to be invocable on its own and even run thru an ODT, CANDE apparently was broken. Attempting to reinstall, including cleaning out all the stuff Unisys leaves in the registry after uninstall didn work for the reason that became clear when I got to this post, thank you. A lot of stuff seemed to still work, ODT, MCP console but not worth keeping with such basic breakage, so luninstalled and will maybe see what they put out in August. It wasn’t clear if you were referring to MCP Developer Studio, but when I went to the Unisys site, couldn’t even see a way to buy it or any info like that. The thing that happens on install after the 1903 build is that the msi process bottoms out asking for disks with the Janus drivers which ofc aren’t available. Unclear exactly how this trips that behavior but am clear that before the missing driver situation did not occur during installation.
I did not however get the IRQ crashes, presumably that would have come later.
Sorry for the delayed reply, Juan — your comment got overlooked in the moderation queue.
Unisys does not sell directly to small customers any more, so if you are interested in Developer Studio, you would have to go through one of the approved VARs (Value Added Resellers). If you are really interested in Developer Studio, I will try to find VARs you can contact. I need to warn you that the license is about $1000/year, depending somewhat on the term of the license.
I recommend, though, that you wait another month to see what the next edition of MCP Express is like, which should come out in early August.
np, I didn/don’t expect rapid reply. Yes, I knew/assumed the price from your posts here, I wouldn’t get it unless they didn fix express which, ty again, for confirming ETA of the next release which I assume will be 19. FWIU 19 has a new TCP stack so I assume that will fix the problem.
I definitely would be a small customer, and no I don’t think I want to go thru a VAR. I have two legs to my mainframe interests, MVS over Hercules and MCP XE so the Unisys leg blocking isn’t a problem. The thrill for me is being able to run these systems for free on modern PCs and anything I develop for general use I would want also to be on that basis. In the unlikely case that 2020 XE doesn’t fix the problem, I’ll wait to see what happens with ’21. Free now, but both IBM and Burroughs had prices on the order of a million dollars. What a great time to be alive :)_
So I saw in the unisys google group that MCP 6 was supposed to be released and did download it. Although it still says 5 in MIM, there is a ClearPath MCP Express Release 6.0 html file in the Install directory, which doesn’t appear to be changed. The licence on the download is updated and states that the download is good to July 2021. Unfortunately the TCP issues isn’t addressed and it’s not MCP19. When you try to install it still gets the asking for Janus drivers situation. There’s nothing about this in the install html and it looks like they just repackaged the prior release without any changes. The getting started guide says MCP Express 4. Everything was built 2020-7-7 so it’s not exactly identically the prior release. FWIU, Unisys has an every 2 years policy on this so perhaps they simply push out the old stuff on the odd years, explaining the earlier than expected release, in which case it does look like it will be necessary to just wait and check again next year.
Hi Paul,
Thanks for your reply. Indeed none of the options you mention are very attractive. I am considering to re-install MCP Express on another old laptop which is still running on Windows 7, but must check first if that old machine meets the HW specs. Plus, having to do all the set-up again is not something I look for either. Other than that, it seems that waiting it out until Unisys releases MCP Express with TCPv3 is the only option. Six months of waiting ….phew…
Jos — Here’s a tip that may help reduce a lot of the setup when reinstalling MCP Express or moving it to another system. Before you uninstall the XE software, move or copy the 20GB emulated disk image, usually named disk.xxx, out of the folder you designated for it when you originally installed XE. The MCP environment must be halted when you do this, otherwise you could end up with a corrupted disk image. In order to reinstall, you must first uninstall XE with the “full” option, which will remove the disk image in that folder, anyway.
If you have created additional disk units, move or copy them out of that folder as well.
After installing or reinstalling XE, but before you do the first halt/load, go to the folder with the disk images and replace the disk.xxx file created by the install with the one you previously saved. You can move your other disk images, if any, back into the folder at this time, too, although you’ll need to run System Editor to add them to the PCD.
This should preserve all of the MCP settings you have created or modified since your original install.
Note that this technique will not work across an XE version change like the ones that occur each summer, because the MCP disk image contains license keys with expiration dates. In that case, what I do is save the disk.xxx file from the prior version, change its name to something like disk.VRR (V=XE version, RR=MCP release level), and after the new version is installed, move that renamed image back into the folder with the new disk.xxx image placed there by the install. You’ll also need to run System Editor to add this additional disk to the PCD.
Once you halt/load from the new disk.xxx, the old disk should have a unit ID (e.g., PK602), but it will probably show as either CLOSED or UNLABELED in response to a PER PK command from the ODT. You can fix that with an LB command to give the pack a new name, e.g.,
Now you should be able to access all of the files on the old disk, and copy them as desired to the new family DISK. This is the technique I use each time a new version of XE comes out.
Simply copying the disk image file (with the MCP shut down, of course) is also a way to get a complete backup of your system. 20GB is a lot to try to archive, but the image should compress pretty well, especially using something like the 7zip .7z format.
Great tips Paul. I will certainly use these. I did find another old laptop with Windows7, but with only 2GB of RAM, I am afraid it does not meet the specs. Am currently trying to get a WIn7 running on a laptop with an Intel Core i5 and 4GB RAM. Bit of problem since the Win7 license seems tied to the other laptop. By the way : For whatever reason , sometimes the MCP Express DOES work in the Win10 laptop. It seems (but I am not sure) that waiting a long time between starting the MCP firmware services and starting the MCP Console decreases the chance on getting the Janus.sys IRQL_NOT_LESS_OR_EQUAL issue. A long time being >5 minutes. Who knows I might not have to switch systems after all. Will keep you posted. Thanks for your help!!
This series has been a great help. I hope to find the time to implement the changes discussed in this post soon. Do you have a link to the next article discussing configuring some additional TCP/IP features of the MCP? I haven’t been able to find it.
Alas, there is no next article. I stopped generating blog posts on MCP Express when the problems with networking on Windows 10 versions after 1803 became apparent. My impression is that most people are on Windows 10 by now, and there isn’t much point is blogging ahead if readers aren’t able to follow along on their own systems. I plan to resume the networking topics (and some others) after the next iteration of MCP Express comes out (hopefully in August) and we can see how it behaves with Windows 10. I’m currently writing a post on preparing for the next MCP Express transition, and hope to have that published in the next week or so.
Posted last above as soon as I ran into the Janus drivers issue. Cancelling all the driver prompts allows the install to proceed and it’s possible though it seems quite unlikely based on given evidence that the TCP situation is fixed, but I haven’t verified that yet. FWIW, Windows isn’t my default OS, although I’m very experienced with it, having worked in it’s early development at IBM. Although I had disabled updates, it performed an update for Edge anyway. I don’t think this is relevant but it’s not outside of their established behaviour that that could have affected the network stack. After the reboot the MIM install seemed to complete OK, everything looks the same but I didn go further.
(ofc meant OS/2 dev at Boca)
I think I just thought I had disabled Windows update, I took what action I could but I don’t think they actually permit you to completely disable it. In any case I just verified that after the Edge update the OS version is still 1903 (18362.959).
Based on Paul’s new post, it’s possible Windows 2004 may be a factor, will wait till he publishes new post on MCP 6 and retest.
Did update to 2004, no change in re Janus drivers. Did another search for the drivers with no luck. Still haven’t gone past install will wait for the post before checking if stuff works at least locally.
Please see my reply to your comment on the “Preparing for the 2020 MCP Express Release” post:
https://unite.org/wp/preparing-for-the-2020-mcp-express-release/#comment-32.
OK https://meansofproduction.biz/images/JANUS.PNG is a screenshot of the situation. The driver dialog “Files Needed” covers the other which I think in the successful installs before 1903 just went as you noted without interaction, i moved it out of the way so they’re both visible in screenshot. This time I made sure I ran MIM as admin. As far as extracting as admin there’s no way to do that in File Explorer but I can force the unzip to run as admin one way or another. At this point I suspected something messed up in the registry. As noted I above I manually cleaned the registry when I found Unisys left stuff there even after an uninstall. As you can see it’s looking on H: for Janus.sys and there’s no Janus.sys anywhere on that disk. So I looked in the registry for stuff with Janus and found entries I didn get before. Looking at clearing these out now.
To be clear, Windows does NOT ask for permission to install drivers or to trust Unisys, probably as as a result of that having been done way back when.
Ha! I’ve found the drivers, there are in program files!
So when I give MIM the (6) drivers it accepts them all. FWIW, I was able to clear most of the Janus entries from the registry (before I found the drivers) but the ones associated with the driver files themselves where immutable. Since before this problem I had a working (MCP 5) install and I don’t need stuff to work other than locally which it was doing fine before 1903, I assume I’m back to that status quo ante (but with MCP 6), if not will say so here.
So I went thru the procedure of setting the hostname (to something other than the default) and that went OK, verifying that MARC and CANDE were working where they were not before as noted at the start of this saga. TCPIP and CNS started fine but then right after that I got the IRQ crash (for the first time) where it did say it was in the Janus drivers. Stopping here for today, will look at the contributed fix for the IRQ crash later.
Well, the situation in your screen shot is something I’ve never seen before. What is drive H:? Do you have a non-standard Windows disk configuration?
I seems from your later comments that you have gotten around this problem. If not, please let us know.
The box has 6 or 7 disks, internal SSDs and external USBs one for legacy Windows 7 (32 bit) and the remainder are linux partitions besides DOS 10. H was actually created by DOS 10 64, I believe as well as another (D:). Yes, after clearing the driver issue I would have been back to normal but for the IRQ BSOD. I did execute the workaround once, which IIUC, is simply to shutdown the firmware stack before shutting down Windows after the BSOD (and presumably always). BTW, unlike startup, where the NTAgent starts the other services, you have to stop each of the four services individually. I haven’t used enough since that to know if it is a durable workaround at least for a single OS epoch and will await your MCP 6 writeup before doing so.
My Win10 disk setup is far simpler, yet I’m still getting propmts of the same type both in pre-2004 and 2004 Win10 builds. In my case first one refers to following path (apparently where Janus-related *.inf files were supposed to exist by some contrived logic):
D:\Windows\System32\DriverStore\FileRepository\netujp.inf_amd64_68541080ae778b30
This is quite interesting, not only because of D: drive letter, but due to ‘amd64’ name component all while MCP Express doesn’t support AMD systems (needed to tweak one of PowerShell modules in order to install it on small Win8 machine, where it works surprisingly reliably btw.)
When I cancel these prompts – I’m not sure where these files are to be legitimately found – I see each file prompted is copied from some C:\Program Files\Unisys subfolder to C:\Windows\System32\drivers, but once MCP system starts I can’t ping through EVLAN either way.
Also, I can confirm uninstall leaves plenty of Janus-related registry keys, some of them can’t be even removed.
For the drive D: Janus driver problem during installation, I suggest that you write up what is happening and send that in an email to MCPExpress@unisys.com. This sounds like this may be an issue with the XE installer. Make sure you describe your hardware and software configuration, and include details for any virtualization layer you are using. MCP Express is offered by Unisys without support, so it may take a while to get a reply, or you may not get one at all, but at least Unisys will have that information.
If you get a response that says anything interesting, please post it as a comment here. Thanks.
An update to MCP XE on Win10-2004.
I have grown a bit tired of trying (and re-trying) and re-trying to start MCP under 2004. So, I’ve kept it running for almost 3 weeks – but that was/is getting in the way of doing other things. So, I finally had to take it down and made a decision to try it on 1803.
I run MCP XE on Win10, under a Parallels VM on MacOSX (MOJAVE, 6-core MacPro 6,1 with 64GB ram) on Win-2004 (I think it’s 2004 … at least well past 1803). I do have a backup history of VM’s so I located one from March 2019 at the 1803 level and activated it and then repeated the full install of MCP XE under that environment. I thought it would take me less than an hour to get it going but I did fight with some other Windows issues – notably the resolution on my 4K monitors-and this resulted in the ODT’s and MARC running in windows the size of postage stamps until I finally got the scaling resolved. In the end, I had it up and running after about 4 hours-pretty much mirroring my Win10-2004+ installation. I can now continue on the little project I am doing more easily. Next time I will use Paul’s procedure for cloning DISK1 within the license year.
Now I can start and re-start without the annoying JANUS BSOD’s. That means I can take it down and do some of the other things I am supposed to be doing.
Next issue up (and this is the point of this post) is stopping Win10 from rolling me forward to 1903 and beyond. Simply blocking the updates in the Windows Settings buys you about 35 days but then you are essentially forced to update/roll forward-and I know that will be 1903 and here come the BSODs again…. So, my system will automatically move ahead about Oct 28th if I can’t block it.
I have found a couple of methods to kill the updating in Win10 – one using the system’s Group Policy Editor and another with a registry hack. The details are in the link at the bottom of the post so I won’t repeat them here – but I have done both and we’ll see how it goes.
I do have multiple backups of the thusly configured VM’s, with the updating turned off which might help me in a month – or maybe I’ll get lucky and I will have stopped the updates until perhaps next August when the next release of MCP XE might have this driver issue resolved.
I have limited use for Win now having converted to Mac fully more than 10 years ago – but I do keep the Windows stuff around for some legacy photo stuff (and WordPerfect). So if I had to stay on 1803 forever, well, it wouldn’t really matter to me.
Nonetheless, using VM’s to run Win is something I’ve always felt is so much easier and better. In fact, for my purposes running Win on Parallels on a Mac is the best experience I’ve had with Windows since I first started using Win in the early 80’s. Backup and restoration is a breeze and it fully integrates with drag and drop and the clipboard with my Mac – and, in fact, all my critical files are in Mac space and I simply see them as convenient drive letters (back and forth) from Win.
Here’s the cookbook link (from August 2020) to run GPED and hack the registry. I’d be interested in your comments.
https://www.windowscentral.com/how-stop-updates-installing-automatically-windows-10
jc
A summary of what happened: something fouled the install process, probably my hive ops, causing the prompts. What was not made clear was that I expected the Janus drivers to be completely eliminated in MCP 6 so that them being asked for indicated that the networking issue was unfixed. If the workaround eliminates the IRQ crash completely and permanently once applied then I will in fact be back to the status quo ante where I had the client apps, prgmrs workbench, etc working before 1903. If not as noted, I can wait for Unisys to actually correct the problem (in 2021), get my mainframe fix from the IBM stuff 🙂