
The 2020 version of MCP Express, version 6.0 is now available. If you have not already done so, you can register for the release at https://secureoutreach.unisys.com/mcpexpress. You should receive an email response within one to two days with a link to the download.
Unisys did us a favor this year by releasing the new version a couple of weeks earlier than in the past, so we have at least a little overlap between the new version being available and the license for the prior version expiring. I hope they continue this practice in the future.
In this post, I will discuss my experience with installing and configuring MCP Express (XE), how to deal with the prior version's Logical Disk image that I suggested you capture in the previous blog post, and what appears to be a useful workaround for the Windows Blue Screen of Death crash that many users have experienced when running XE on Windows 10 releases later than 1803.
Before jumping into the process of updating XE -- or installing it for the first time -- you may wish to review my prior blog posts in this series:
- Getting Started with MCP Express
- Installing MCP Express - Part 1
- Installing MCP Express - Part 2
- Tuning the MCP Express Installation
- MCP Shared Directories and Windows Utilities
- External Networking with MCP Express
- Preparing for the 2020 MCP Express Release
If you have the prior version of MCP Express currently installed, I strongly recommend you read at least that last post, as it describes a couple of techniques for backing up your files and preparing for the upgrade discussed below.
Installing MCP Express 6.0
The first thing to do after receiving the download link from Unisys is to download the release package. It is a standard zip archive, about 2.5GB in size. The SHA1 signature for my download file is:
96412EB7C28EEF1B9612BF6A9F0F2D09869D2B2A
You can generate the signature using the free 7-Zip compression tool, or in PowerShell 4.0 and later, this command:
Get-FileHash <file path> -Algorithm sha1XE 6.0 is still based on MCP release 18.0 (SSR 59.1). In fact, it is exactly the same as version 5.0 except for an updated license expiration date (31 July 2021) and a few tweaks in the installation XML and PowerShell files. The MCP Logical Disk image is exactly the same, so there are no new MCP features.
Installing the MCP Express 6.0 Software
If you had previously installed XE, you must uninstall the existing version before you can install the new one. You must use the MIM utility from the existing (5.0) version to do this. Make sure you select the Programs and Data option on the Remove Options dialog. See page 4-10 in the MCP Express Getting Started Guide for details. Note that this option will remove the MCP Logical Disk image (and thus, all of your MCP files) from its assigned folder, so copy or move that disk image elsewhere before starting the uninstall if you want to retain that data. See the prior blog post for details. I discuss what to do with that disk image below.
The next step is to unzip the download file to extract the installation folder. The space required for the extracted files is only slightly more than that of the zip file. As discussed in "Installing MCP Express - Part 1," it is a good idea to have a separate folder just for XE files and to unzip the installation folder into that. Do not move or remove the installation folder after XE installation is complete -- you will need it next year to uninstall this version.
Important -- before unzipping the downloaded file, right-click the file in Windows Explorer and select Properties. In the resulting window, tick the Unblock checkbox if it is present and then click OK. If you don't do this, some of the executable files in the package may be marked as unsafe and will not install properly.
Follow the instructions in Section 2 of the MCP Express Getting Started Guide and the "Installing MCP Express - Part 1" post to install the software. The Getting Started Guide is still labeled version 4.0. MIM still has a 5.0... version number. There have been no changes to the Unisys installation procedures, but I will discuss some additional, optional steps in the following.
If you saved your MCP Logical Disk image file from the prior version of XE, stop at the end of Section 2 and follow the two instructions below. I'll refer to this later in the post as "reinstating" a disk image. If you do not have a prior disk image file, please skip to the next section.
- The disk image file from the prior release was originally named
diskxxx.asd. If you have not already done so, change the file name to something else, but retain the ".asd" extension. The word "disk" followed by a version number or a year are good choices, e.g.,disk1850.asdordisk2019.asd. Do not include any spaces in the name. - Move or copy that image file to the folder you specified during the install for the MCP Disk Image Location. The new
diskxxx.asdfile created by the install should already be there.
Configuring MCP Express 6.0
Continue with the installation instructions in Section 3 of the Getting Started Guide and "Installing MCP Express - Part 1," by starting the MCP firmware services, starting MCP Console, and running System Editor to create a new PCD.
If you are reinstating a prior disk image:
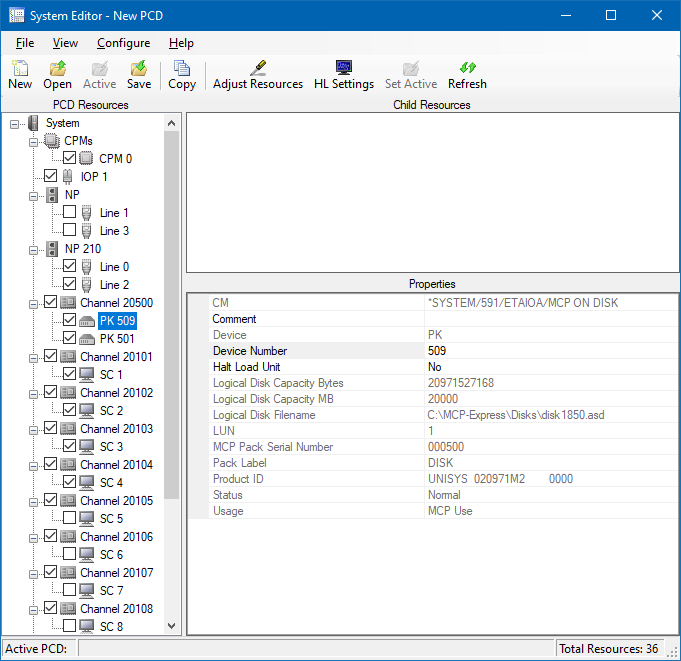
- You will see two disk units in the PCD Resources tree of System Editor, probably labeled PK 501 and PK 502.
- If you click on those labels, you will see the properties of the disk units in the right-hand pane, particularly the Logical Disk Filename (your
.asdfile) and the Pack Label (which should beDISK). On my system, the disk image from the prior version got labeled PK 501 and the newdiskxxx.asdimage got labeled PK 502. - The unit numbers themselves are not significant, but I prefer to have the new system disk unit as PK 501. You can change unit numbers in the Device Number field of the right-hand pane. I changed the unit for the older image to PK 509, then changed the unit for the new disk image to PK 501. Note that you need to sequence these changes so that no two units have the same number at the same time.
- On my system, it looks like this:
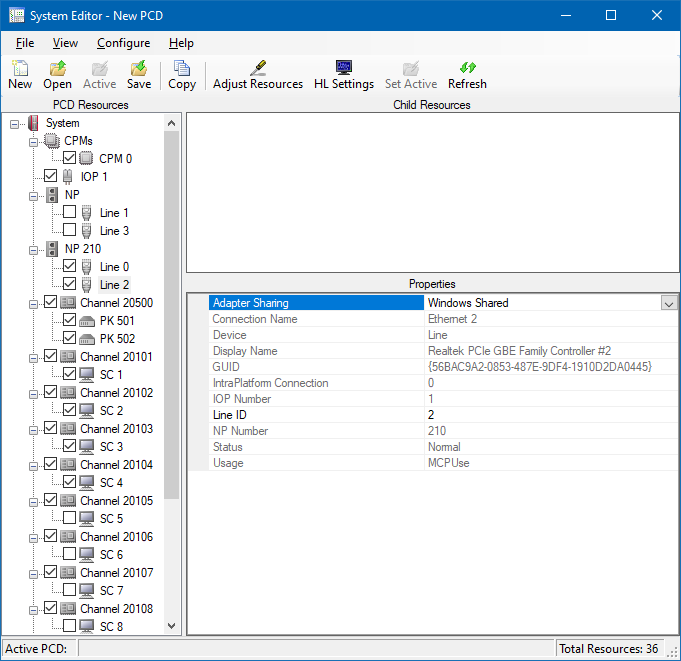
While we are in System Editor -- if you want to set up an external LAN connection for the MCP, we can do that now. Under the "NP" node in the Resources tree (not the "NP 210" node), click the labels of each of the lines in turn to to inspect their properties in the right-hand pane and determine which one is associated with your Ethernet adapter. The Connection Name and Display Name properties are the best indication of this. Drag that line to the "NP 210" node and tick its checkbox to include it in the configuration. Also change its Adapter Sharing property to "Windows Shared."
You may also wish to untick the SC 3 and SC 4 nodes, as you probably do not need more than two ODT units. When finished, save the PCD, make it active, and proceed with the rest of the configuration steps in Section 3 of the Getting Started Guide and in Installing MCP Express - Part 2.
Once the MCP is loaded, don't forget to set the MCP host name with the ODT HN command. This name should match the first node of the DNS name specified by the TCPIPHOSTNAME (or TCPIPHN) command in your TCP/IP INIT file. A halt/load is required to make the new host name effective, but hold off doing that until you have read the next section on reinstating the prior disk image.
If you have previously installed XE on your system, you should not need to follow the steps in the "Configuring Windows to Use the MCP Host Name" sub-section of Section 3 in the Getting Started Guide -- that configuration should already be in place.
Finish Reinstating the Prior Disk Image
If you are reinstating a prior disk image, then after loading the MCP you will need to make an adjustment so that disk image will be available to the MCP. This section describes that adjustment, as well as some things you can do with the files on the reinstated image.
Making the Reinstated Disk Image Available
On the ODT, do a PER PK command. You should see a response similar to the following. The commands cited below use the unit numbers from my PCD configuration above. Substitute your unit numbers as appropriate.
--------------------------------- PK STATUS ----------
501*B            [000500] #1 DISK (216)
509*B            [000500] #1 L A B E L   E R R O R
If you do not see an entry for the reinstated disk unit, enter this command on the ODT:ACQUIRE PK509. That should bring the unit into the current MCP configuration. A space between "PK" and the unit number is optional.
Despite what the PK Status display says, there is nothing wrong with the label in the reinstated disk image. The problem is that it has a family name of DISK and a serial number of 000500, exactly the same as that for the new XE 6.0 disk image. This means that the labels of the two units are in conflict. Since PK 501 is the halt/load unit, it takes precedence, and the MCP refuses to mount PK 509. You can enter an OL PK509 command on the ODT to see more information about the unit.
Fixing this is easy:
- On the ODT, enter
CLOSE PK509. This removes the label information for the unit from the MCP's tables and logically detaches the unit. - On the ODT, enter a command similar to this:
LB PK509 SERIAL=200722 NAME=DISK1850 OLDNAME=DISK
This will "relabel" the disk unit. The serial number and new family name can be anything that does not conflict with those attributes of another disk unit. TheOLDNAMEparameter simply validates that you are changing the label on the correct unit. If you omit this parameter, the system will display an RSVP (Waiting entry) on the ODT asking you to confirm the operation.
After entering this command, you should see a series of messages on the ODT:
PK609 UNIT RELABELED
PK609 REBUILDING FAST 8% FAMILY: DISK1850 [200722]
PK609 REBUILDING FAST 31% FAMILY: DISK1850 [200722]
    ...
FAST REBUILT FOR:PK609  DISK1850
The FAST (File Access STructure) is the file name index structure for the MCP disk file system. The number of "rebuilding" messages and their percentages will vary with the number of files on the disk. The unit is now mounted and its files are available to the MCP and user programs.
Reinstating the Prior CNS and TCP/IP INIT Files
Now that your prior disk image is available to use, we can simply copy some elements of the configuration from that disk rather than having to recreate them. For example, you do not need to edit the CNS and TCP/IP INIT files as discussed starting on page 3-3, item 3, in the Getting Started Guide. Instead, you can copy those files from the prior disk image after the MCP is loaded and running. It is best to do this before the ??PHL command in item 2 on page 3-2. On the ODT, enter a command similar to this:
COPY CLEARPATH/INIT/CNS, CLEARPATH/INIT/TCPIP FROM DISK1850(DISK) TO DISKassuming DISK1850 is the family name you gave to the prior disk image with the LB command above and you used the default names for the INIT files. If you used different names, substitute those in the COPY command above. A family destination of TO DISK is the default and can be omitted. If you don't remember the names, you can list file names using the PD or PDIR ODT commands. See the System Commands Reference manual for details.
You will need to "bounce" MCP networking after the files are copied to make them effective. The easiest way to do that is with a halt load, i.e., that ??PHL command.
Reinstating the Prior USERDATAFILE
If you added or modified usercode accounts in the prior version of XE, you can also copy those changes from the prior disk image. User accounts are stored in the file *SYSTEM/USERDATAFILE, also known as the UDF. By default that file is stored on family DISK, but you can change the location (but not the file name) using the ODT DL command. The UDF is a system file and cannot simply be overwritten. Using the MAKEUSER utility, however, it can be replaced with another UDF.
To reinstate the UDF you used with the prior version of XE, first copy the old UDF from the prior disk image to family DISK as a different name, e.g., from the ODT:
COPY *SYSTEM/USERDATAFILE AS *SYSTEM/UDF-2019 FROM DISK1850(DISK) TO DISKThe "TO DISK" clause is optional, as before. Next,
- Sign on to MARC with a privileged usercode. The pre-configured
ADMINISTRATORusercode will work for this. - On the Action line of a MARC screen, enter "
HOME UTIL MU" and transmit. This will initiate the*SYSTEM/MAKEUSERutility. All of the commands in this section are case-insensitive. - On the next screen requesting Optional File Equation(s), enter nothing and simply transmit.
- MAKEUSER will identify itself on the screen. Clear the screen, enter "
$SET LIST IGNORE" and transmit. This is optional, but will make recovery easier if you make a mistake. - Clear the screen again, enter "
RECALL *SYSTEM/UDF-2019;" and transmit. Note the semicolon (;). This will change the old UDF toUSERDATA/mmddhhmm and the file named in the command to*SYSTEM/USERDATAFILE. The recalled UDF goes into effect immediately. - Clear the screen, enter "
END" and transmit to quit MAKEUSER. MARC will reply with a screen asking you to press SPCFY (the "specify" key in your emulator). You can just press transmit instead.
Copying Your User Files
All of your user files on the prior disk image, whether for the pre-configured ADMINISTRATOR account or other accounts you may have created, can be copied to the new DISK family with this command.
ADD *USERCODE/= FROM DISK1850(DISK) TO DISKThe WFL ADD command differs from COPY in that it will not overwrite existing files of the same name. Note that when copying from disk to disk this way, object code and other XE-restricted files can be copied.
Copying DMSII Data Bases
If you have DMSII data bases you want to bring over, you should be able to do so using WFL COPY commands. Because XE 6.0 is the same release level as 5.0, no DASDL updates or other changes should be needed and no user programs should need to be recompiled. This will work best if the data bases were cleanly shut down, but if you have the most recent audit trail files, normal data base halt/load recovery should bring "in-use" data bases to a consistent state. You will need the following files:
- The
DESCRIPTION/<data base name> file (and its corresponding DASDL source file, of course). - All data base files (i.e., <data base name>/=, with
FILEKIND=DBDATA). DESCRIPTION/<data base name>/MCPSQL-CATALOG(if using MCPSQL).- The data base
CONTROLfile (<data base name>/CONTROL). DMSUPPORT/<data base name>RECONSTRUCT/<data base name>DMINTERPRETER/<data base name> (if generated)- <data base name>
/AUDITnnn files -- only the latest one should be needed, but it won't hurt to copy the last few, just in case.
Other Files to Consider Copying
The following is a list of some other files that may be candidates to copy from the prior disk image. Most of these involve system features we have not talked about yet. My recommendation is that you not copy any of these unless you know what they are, have experience in using them, and the files have information you want to preserve. Many will require a halt/load to bring into effect, and some may require special actions, such as shutting down their related services, in order to copy them.
Copying any of these files is completely optional, so please skip this section unless you have a specific need for any of them.
*BD/=
"Printer backup," i.e., spooled, printer files that have not yet been printed.*COMS/CFILE
The configuration file for COMS. This has a binary file internally, so it is not something you should try to look at directly. It is maintained by the COMSUTILITYwindow, accessed from MARC. See the Transaction Server For ClearPath MCP Configuration Guide for details.*SYSTEM/NXSERVICES/CONFIG
Configuration data for Client Access Services -- SMB network protocol, directory shares, etc.*SYSTEM/RESOLVER/CONFIG
Configuration data for the TCP/IP domain name resolver client.*TIME/CONFIG
The configuration file for the SNTP time synchronization client. This is maintained usingNA TIMEODT commands.*SYSTEM/PRINTERINFO
Configuration data for printer devices managed by the MCP Print System.*SYSTEM/BACKUPFILELIST
Active print requests (i.e., the print queues) for the Print System. You'll need to copy the *BD/= files if you want to copy this.*SYSTEM/PRINTSYSTEMCONFIG
Global configuration settings for the Print System.*SYSTEM/PRINT/FONTSUPPORT/DATAand*SYSTEM/PRINT/FONTSUPPORT/DATA/=
Font information for the Print System.*MCPSQL/CONFIG
Configuration data for the MCPSQL SQL interface to DMSII.*SYSTEM/SUMLOGand*SUMLOG/=
System log files. Most users won't be interested in these files -- you have to be hard core to want to keep them.*SYSTEM/SUMLOGis the current log file, so this should be copied as a different name.*SUMLOG/=are older system log files that have been closed, either because they became full or because they were released with theTLODT command. These files are analyzed using the*SYSTEM/LOGANALYZERprogram.*SYSTEM/SECURITYLOGand*SECURITYLOG/=
A second set of log files for security-related events, also analyzed by*SYSTEM/LOGANALYZER.*TANKFILE/SYSTEM/CANDE
CANDE options and pending updates for user workfiles.*KEYEDIOII/CONTROL
Global options for the KEYEDIOII index-sequential file management facility.
Removing the Prior Disk Image
After copying any files you need from the prior disk image, you may wish to discard that image, or at least take its disk unit out of the XE configuration, especially if you are short of disk space in your Windows environment. I usually leave the unit in place, just in case I need something else from it later. If you want to get rid of it, however, here's what to do:
- Halt the MCP, either by entering "
POWER OFF SYSTEM" on the ODT or clicking the Halt button on the MCP Console toolbar. Wait for the components in the MCP View pane of MCP Console to attain a status of Offline. - If you want to keep the disk image but just remove it from the XE configuration, open the folder you designated for XE disk images and drag the image file to another location. Confirm the warning about moving the file.
- Open Logical Disk Manager (LDM) in MCP Console. If the disk image is no longer in the XE disks folder, it will be highlighted in the LDM with a warning that the path is no longer accessible. Right-click the image name and select Remove. If the image is still an active entry in the LDM, right-click it and select Delete. This will permanently remove the image file. In either case, the unit will also be removed from the PCD.
- After the next time you load the MCP, you may see a Waiting message reporting a configuration error. Enter <mix#>
Yon the ODT to see the detailed message, which should indicate that the disk unit is no longer available to the MCP. Enter <mix#>OKto dismiss the Waiting entry.
A Workaround for the Windows 10 BSOD
As discussed in my prior blog post, many XE users running on Windows 10 have experienced crashes resulting in a Windows BSOD (Blue Screen of Death). The message on the crash screen is "IRQ NOT LESS OR EQUAL" and references "Janus.sys," which is a component of the MCP NX/Net networking firmware. In my experience, this started after Windows 10 was updated beyond release 1803, and made XE unusable. My solution was to keep my Windows 10 laptop on 1803, but as Microsoft had stopped supporting that release in December 2019, staying on that release was becoming increasingly undesirable.
This problem has not been seen on Windows 7. I have no information on it for Windows 8.
Thanks to some recent trial-and-error work by Jim Camelford of Toronto, Ontario, we now appear to have a relatively simple workaround for this problem. As I write this, the workaround has only been in existence for about a week. It has been working for me, but we do not yet have enough experience with it to know what other issues may be lurking or how well it will work for everyone. The workaround is entirely procedural, so it should be safe for you to try -- or at least no less safe than trying to run XE and have Windows 10 crash.
The workaround is depressingly simple -- just be patient:
- After booting Windows 10, wait for it to completely initialize and settle down before you attempt to start the MCP firmware services from the system tray. If you are going to start XE right away, then during this time do not try to do other activities on the system. On my inexpensive HP 14 laptop with a Pentium Silver processor, five minutes seems to be a sufficient time to wait after booting. You may need to experiment to find the safe amount of time your system requires.
- After starting the MCP firmware services, wait until they completely initialize and settle down before starting MCP Console. On my system, three minutes seems to be sufficient.
- Wait for MCP Console to completely initialize before loading the MCP. All components in the MCP View panel should attain a status of "Offline" and the toolbar should be fully populated (System Editor, Logical Disk Manager, System Settings, Load, Halt, and Help icons present).
- When finished using XE (or before shutting down Windows 10), halt the MCP, either by entering the "
POWER OFF SYSTEM" command on the ODT, or by clicking the Halt button on the MCP Console toolbar. Wait for all components in the MCP View panel to attain a status of Offline. - Before shutting down Windows 10, stop the MCP firmware services from the system tray and wait for them to be reported as stopped. You can left-click the XE system tray icon to see their current status.
- Important -- if you experience the BSOD crash, wait for Windows 10 to automatically reboot, then manually reboot again. This appears to clear out some bad stuff left over from the crash. Then start at item #1 above. Jim Camelford has reported that if you are hosting Windows 10 under a virtual machine (e.g., Parallels on Mac OS X), also reboot the host system (i.e., the Mac) and restart the VM.
Before installing XE 6.0, I updated my HP 14 laptop to Windows 10 release 2004. Since adopting this workaround procedure several days ago, I have not experienced a single crash. The procedure above may be a little more conservative than absolutely necessary, particularly #5. Please feel free to experiment with variants of this procedure and post your findings as comments to this blog or to the comp.sys.unisys newsgroup.
Best wishes for successfully updating to XE 6.0 on your system.
After resolving the issues I had, and following the workaround, I still get the IRQ crash. One thing to add to the procedure is to run the task manager in performance view to determine when the system is quiescent. The machine I’m using is Intel 4750 i5 with 4 threads. Waking after sleep with the MCP firmware running trips it but it’s pretty random.
Putting the system to sleep while the MCP environment is running has never been supported on the emulated systems. Given the instabilities introduced by later releases of Windows 10, I’m not surprised that sleeping while the firmware services are running can also trigger a crash.
It’s important to remember that MCP Express is not a consumer-grade application. It’s basically the same server-grade software that Unisys offers for their production customers, just with some restrictions applied. It is primarily intended to run in Windows Server environments as the predominant application on a system, but has been adapted to run as a development environment on personal editions of Windows. We need either to respect its orientation to being a server and leave it running, or to take the convenience hit and shut it down completely when not using it.
Since starting to use the workaround, I have been leaving my HP 14 laptop running continuously. I put a watt meter on it to see what that was costing me. With XE running, but the system otherwise at idle and the screen off, it draws three watts. When very busy, it draws 10-15 watts. After 94 continuous hours powered on, it has used a total of 0.43 kWh. At Tier 1 rates in Southern California, that’s about $0.10USD. I won’t leave the laptop on continuously much longer, but leaving it on for days at a time is not wasting much.
Well I’ve seen the crash in other situations, even with the workaround procedure. If not sleeping was a fix I’d go ahead with the product and turn sleep off, I enabled it to extend life of the box not save the cost of power. Turning it off when XE is running would not be problem if that worked. I think it could be more stable on your system due to it being pentium. Also I’m running off an SSD and a fast system disk could be a factor. The priced versions you have where you’re running the updated TCP stack, does that use the same Janus drivers? I think the essential problem is a conflict between these ancient drivers and relatively new hardware/OS and expect that it will go away when XE carries the new stack, hopefully next year if and when they base XE on 19.
The newer TCPv3 networking implementation no longer uses the NX/Net firmware or the Janus drivers. It is an entirely different architecture. The new TCP/IP implementation is not a function of MCP 18 vs. 19, but of new MCP and networking firmware. My priced version originally used the same CSS 1.0 firmware as MCP Express does, and experienced the same BSOD crashes once its Windows 10 instance was updated beyond release 1803. After updating the firmware to CSS 2.1 and configuring TCPv3 last Fall, those problems went away completely. It is still running MCP 18.
So I agree that the ultimate solution is probably new firmware and TCPv3. I have it on good authority that someone at Unisys is looking into providing that for next year’s XE release, but of course, no promises.
Great! Naturally for free there are zero expectations and as mentioned I can do MVS, which runs on linux, in the interim. However long it is I will want to come back to MCP :).
Also, sounds like on the XE laptop, you’re not actually doin stuff. In any case, if it works for you and for others as well then my situation could just be an aberration.
Yes, that HP laptop is admittedly sitting idle most of the time. I have used it for hours at a time, however, and have done several large transfers over my local network to other systems, all things that would have promoted a crash earlier. I agree that your situation is probably an aberration and something that would be difficult for someone else to research remotely.
Agree, the workaround does (at the very least) reduce the problem, without it you get a crash pretty quick.
It does look like disabling sleep restores stability, I was only thinking the act of hibernation/resume itself should be causing crashes. I was able to install the mcp file copier and workbench, where btw, I have to use the ip (192.168.16.5) as the sharename since it’s not working any other way, that’s unchanged from before 1903. Also I recall having to enable SMB2, i think for XE. The only thing I haven’t done so far (over whole period of MCP use) is set up the external networking where I want to do something a lil different so won’t be soon but I’ll report anything of interest on the blog entry for that.
If you are having to use the EVLAN IP address when mapping a share, have you put an entry in your Windows LMHOSTS file? If so, does that name match the MCP host name (HN command) and the first node of the name in the TCP/IP INIT file TCPIPIDENTITY command?
Yes, you will need to enable SMB2 for the MCP environment, as only SMB1 is currently enabled by default, and a lot of recent Windows systems do not enable SMB1 by default. For anyone who does not know how to do this, use the Administration Center GUI tool (see the “MCP Shared Directories and Windows Utilities” blog post) and enable the ACCEPTPORT445 option. Alas, if you can’t connect over SMB1 to begin with, that probably won’t be possible.
There is an alternate method of updating the SMB configuration, described in the Client Access Services Administration Guide (a Windows Help file) under the topic “Configuration File Attributes > How to Access and Edit the Configuration File,” that uses CANDE and a utility program. You will need to do this with a privileged usercode, like the default ADMINISTRATOR usercode:
1. Get the file
*SYSTEM/NXSERVICES/CONFIG ON DISKas some other name. If the configuration has never been modified, this file won’t exist yet, so get the*SYSTEM/NXSERVICES/DEFAULTCONFIGfile as another name instead.2. Do a find for “
ACCEPTPORT445“. If that attribute exists, set it to TRUE, e.g.,ACCEPTPORT445 = TRUE;3. If that attribute does not exist, add the line above to the file. Somewhere near the top is the usual place, near
BROWSEDOMAINNAMEandRESTRICTTOSHORTFILENAMES.4. The attribute
REJECTPORT139controls access via SMB1. It is FALSE by default. Change or add it as desired.5. Save the file and run this command:
RUN *OBJECT/NXSERVICES("RECONFIGURE <new file name>")This will validate the new configuration, create or update the
*SYSTEM/NXSERVICES/CONFIGfile, and put the new configuration into effect.6. NEVER update the
*SYSTEM/NXSERVICES/CONFIGfile directly.The thing with TCPIPIDENTITY is in your blog entry for non-EVLAN networking, which as noted I hadn’t gotten to yet, but it’s not in the Unisys Getting Started doc, other stuff in first ¶ was done and I presume that will clear the drive mapping. On SMB, you can also check/set it at the PS command line. I expect to checkout the external networking demonstrate some starter capability to use it in ALGOL before the next XE release and hopefully before the end of the gregorian year.
Sorry, I wrote TCPIPIDENTITY, but meant to write TCPIPHOSTNAME. I’ve been doing that a lot lately for some reason. In any case, changing the first node of the DNS name is discussed in the Getting Started Guide, bottom of page 3-3 and top of page 3-4.
meant whole period of XE use. I once was the Systems Programmer in a Burroughs shop, c. MCP 4 and had the SPO for one of the two large systems in that shop, the one used for development, in my office. In that time I would build MCP from source and other OS elements.
Right, that I did do. The HN is recognized everywhere except as the lan share name. I think there may have been a command line thing I once did that set it but not certain and to this point haven’t needed it to work since using the ip address works.
So just got the IRQ crash again and clear by this time it’s not going away in XE 6, so back to Plan A, see what’s in next release. Got it without ever having reenabled hibernation nor deviated from the workaround procedure after starting the MCP with the PCD updated as directed by the first step in the external networking blog entry. Need external to work ultimately but if is stable with just the EVLAN and the action on the PCD reversed, will continue to familiarize with the product pending the replacement of the Janus drivers.
I can’t seem to get past the Windows 10 BSOD issue. I’ve tried the workaround several times, and have tried waiting much longer than the recommended “settle” times. I can get MCP up, and interact with the ODT. But trying to switch from the ODT to do anything else results in a BSOD. Often, just pressing the Windows key to bring up the start menu search field results in a reboot. Perhaps I shouldn’t have downgraded from Windows 7 to Windows 10.